The following is a listing of all posts in the category of Basketball Drills for our site.
If you are looking for specific types of drills, click one of the category links listed here to see specific types of drills.
Defensive Drills
Passing Drills
Toughness Drills
Rebounding Drills
Offensive Drills
Shooting/Scoring Drills
Transition/Conversion Drills
Competitive Drills
One on One Drills
Sureness with the Basketball Drills
The drills you run during your practices and with your team need to be designed to teach and rehearse the skills that the players you coach need to have to have team success utilizing your system of play.
In your practices, players need to feel that they are playing basketball, and not just running drills.
Legendary Coach Don Meyer used to say “Be a skill coach, not a drill coach.” The art of coaching your team is to take the basketball drills that you see on this or other basketball coaching sites and adapt them to your needs.
Our 3 Most Popular Defensive Basketball Drills
Diagrams created with FastDraw
Basketball Drills Diamond Shell Drill
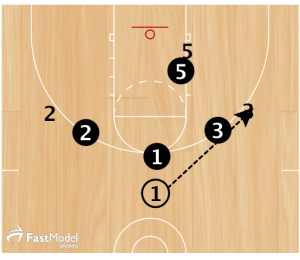
Diamond Shell is a variation of the basic shell defensive drill. The difference is that the offense is in a 1-2-1 set rather than the “4 out” look of the traditional shell drill.
This is a good version of the shell basketball drill to use if you want to put an emphasis on your post defense. You can work on how the post defender is positioned. You can work on how your perimeter players shade the post to discourage post feeds. It is a great way to work on how and when you double team the post when the ball is on the block. The final piece of the drill is working on how you recover to the basketball and close out to your help spots when the basketball is thrown out of the post to one of the perimeter offensive players.
To see the rest of this drill, click Diamond Shell Drill
30 Second Shot Clock Defensive Drill
A drill to instill in your team the toughness to outlast the will and discipline of the offense to get the shot they want.
If there is no shot clock in your game, you can call the drill “Defensive Perfection” or some similar name to indicate your expectations for what a defensive possession should look, feel, and more importantly sound like.
This drill establishes the mindset that your players are going to have to play between 40 and 60 hard nosed defensive possessions (depending on whether you play 24, 32, or 40 minute games) to win a game.
Rules for Executing “Shot Clock Defensive Drill”
The same five players stay on defense until they can play 30 seconds of game time without giving up a basket or committing a foul.
Start the time when the offense puts the ball in live play and play the possession out. Stop the clock as soon as the offense scores, loses the ball, or misses and the defense rebounds. In other words when that possession ends.
If the defense got a stop, the time on the clock stays. For example, if the clock ticked down to 17 seconds, that is where it starts on this next offensive possession.
If the offense scores, the clock resets to 30 seconds and the drill starts over.
You can find the rest of the 30 Second Shot Clock Drill, along with other defensive drills here.
Defensive Drift Drill
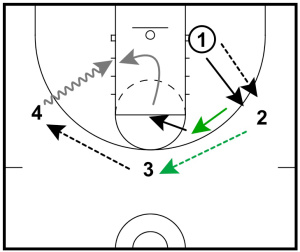
The defensive drift drill isolates one defensive player executing several defensive skills that are often required during one defensive possession,
The drill starts with #1(defensive player) passes the ball to #2 (the player that #1 is guarding) and then executes a perfect close out.
As 3 receives a pass from 2, defensive player 1 jumps to denial position on the player he is guarding (#2)
As the ball is swung to #4, #1 jumps to the help spot.
The drill concludes with #4 driving and #1 taking a charge. To keep from putting players in a spot where they could get injured, have #4 jump stop and gently push the ball into the stomach of #1 to signal the charge. When taking the charge, #1 should keep hands in the air to keep them from bracing the fall and push back to land on their rear end.
Find more details on this drill, as well as two more closeout drills, by clicking here.
Our 3 Most Popular Basketball Drills to Improve Passing
Argentine Passing Drill
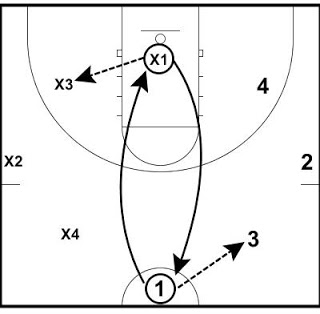
This basketball drill works on both passing and catching along with being a great conditioner.
The image shows the drill being run in the half court, but you can run it as a full court drill to get even more conditioning.
The drill is run for one minute. Players are paired with the player across from them in the drill setup. in the diagram at the left, 1 and x1 are paired, 2 and x2 are paired. 3 and x3, and 4 is paired with x4. Use 2 basketballs for the drill. In the example, both x1 and 1 are starting with a basketball.
Players pass the ball to their right and then sprint straight across the floor to change spots with their partners before the ball arrives in the spot they are running to.
As a coach, you must set high standards for the drill regarding passing and catching the basketball. When a basketball hits the ground, players aren’t sprinting across to their new spot, or passes are fumbled, put one minute back on the clock and start the drill again.
Get the rest of the details and a video of the Argentine Passing Drill here.
Laker Passing Drill
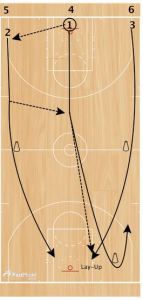
The rule that makes this drill work is that the ball cannot hit the floor.
That means there is no dribbling, no bounce pass, and the ball must be taken out of the net without hitting the floor after the layup is scored.
1 starts the drill by passing to 2. 2 passes back and 1 hits 3 for a lay-up.
2 rebounds the ball out of the net and the players head back to the end where they started. 1 sprints around the cone that are there to teach players to run wide, and 3 sprints out to the opposite wing.
After the first group shoots the second layup, the next 3 players in line are up.
Click here for the rest of the Laker Passing Drill.
Dawg Passing Drill

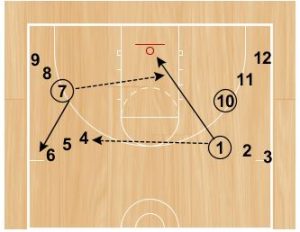
1, 7, and 10 have basketballs to start the drill. 1 passes to 4 and cuts to the basket. 7 hits 1 for a layup. After making the layup, 1 rebounds her own ball, then passes the basketball to 8.
4 passes to 2, then basket cuts for a pass from 10.
To make Dawg Passing into a competitive drill, split your team into two squads at each end of the floor. Time how long players can run the drill with no fumbles, errant passes, or missed layups.
A more in depth explanation (including a video of the Washington team running the drill) of the drill can be found here.
Our 3 Most Popular Basketball Drills for Toughness
Defensive Combination Screening Drill
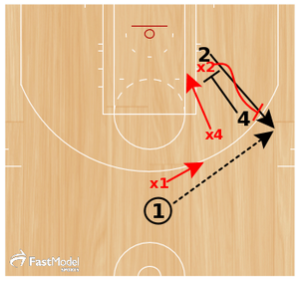
An overload drill to make defenders fight through more rapid fire screening situations than they would encounter in a game. Overload drills are designed to make practices tougher than games.
Credit for this drill goes to Drew Hanlen of Pure Sweat Basketball.
If you have more than one coach with your team, you can use this drill to teach screening and reading/using screens to the offensive players.
Incorporate screens that your opponents use frequently. Then it becomes a 3 dimensional drill. In addition to the defensive and offensive work, you have the scouting/game planning component as well.
Click here for more diagrams from and get more details about this drill.
3 on 3 Guts Drill
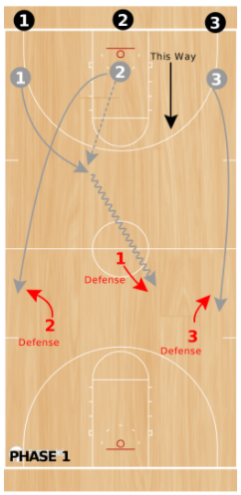
Attributed to Randy Sherman of Radius Athletics.
To get to play offense, the defense must make 4 consecutive stops.
If the offense scores or gets fouled, the defensive “stop count” goes back to zero.
The offense gets one trip up and down the floor, then the next offensive team takes their place.
If the defense takes a charge, they are credited with 4 stops.
The purpose of this rule is to motivate players to take a charge.
Teams switch directions after Defensive rebound or if the offense scores a field goal.
See more details on this drill here.
Shaka Smart Hustle Drill
This drill is used by a lot of basketball programs besides Shaka Smart’s teams. He popularized the drill by participating in it with his players at the 2011 Final Four.
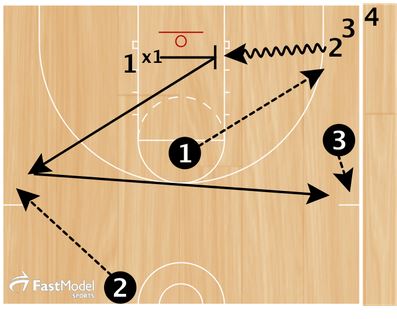
X1 is the player who is performing the drill.
The drill begins with the Coach (Black Circle 1) having the ball at the nail hole.
Defensive player X1 is guarding the post against #1’s post up. The Coach (Black Circle 1) Passes the ball to 2 in the corner. 3 and 4 in the diagram are the next players in line.
2 drives the ball to the basket. X1 should take the charge as far outside the lane as possible. That is not clear in the diagram.
Black Circle 2 is also a coach or a manager. After the charge is taken, Black 2 rolls another ball toward the out of bounds. X1 gets up from taking the charge and dives on the floor to save the loose ball. After that save, his round is completed when Black Circle 3 (Also a coach or manager) tosses a ball and X1 sprints to jump save it from going out of bounds.
Lean more about (and see a You Tube video of) Shaka Smart’s Hustle Drill by clicking here.
3 of Our Top Rebounding Drills
Numbered Rebounding Drill
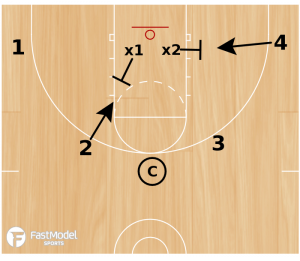
The drill was authored by Kyle Gilreath.
Players 1, 2, 3, and 4 are offensive players and start on the perimeter. X1 and X2 are on defense and start in the lane. Coach Calls out two numbers, example “1 and 4”. Defense must block those two offensive players out and secure the rebound.
The coach should shoot the ball softly off the rim so that it comes off as a game-like and realistic rebound.
Another version of this drill is to have 4 players on offense being clocked out by 3 defenders. Version 3 of the drill is to have the offensive players move to make it difficult for the defenders to find and get and angle for the block out.
I like to make as many drills as possible into competitions. You can create 2 competing teams for the drill along with a scoring system. That system should reflect and reward players for efforts that you believe lead to winning.
Click here for the rest of this drill.
Close Quarters Rebounding Drill
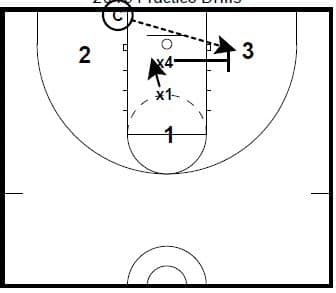
This drill was sent to me by Coach Justin Remmington.
The drill doesn’t simulate game-conditions. What is does simulate is battling inside for defensive position positioning and then fighting for block out position on the shot attempt.
The defenders (x1 and x4) chop their feet until the coach passes the ball out. Coach has the option of passing to any of the players who are on offense in the drill.
1, 2, and 3 pass the basketball without dribbling and without moving. As the passes are made, x1 and x4 adjust their defensive positions.
When the coach hollers “shot” whichever player has the ball shoots and defense blocks out two of the three players. Depending on what you want out of the drill, you can have the unblocked player not go for the rebound. Or, you can have all players rebound, forcing 2 defenders to rebound against 3 offensive players to make it a very challenging drill.
Ideas for making this into a competition: Split your squad into several groups of 3 or create 2 teams where players will rotate into the drill for their teams. Score a point per defensive rebound.
See the rest of this drill by clicking here:
1 vs. 2 Rebounding Drill
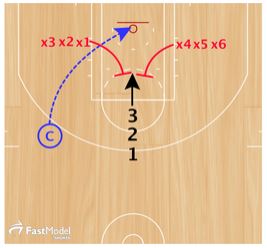
The objective of this drill is to get your defenders to box out hard and to get offensive rebounders to fight through block outs.
A coach or manager shoots the basketball. Both defenders block out the offense while he or she fights the block out in an attempt to get to the offensive rebound.
Defenders block out until the ball bounces twice.
Scoring for the drill:
1) Defense earns one point if the rebound bounces twice before the offensive player touches it.
2) Two points for the offense if they touch the ball in the air.
3) If the offensive player touches the ball after one bounce, the offensive team gets one point.
4) If the offensive player rebounds the ball in the air and finishes a put-back, the offensive team gets three points.
Both teams are on offense and defense for two minutes. The winner is the team with most points at the end of four minutes.
Check out the entirety of this drill here.
3 of Our Top Offense Basketball Drills
3 on 3 7 Seconds to Score Drill
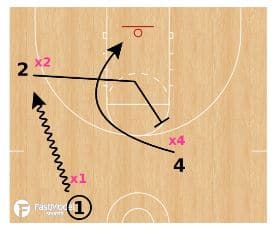
The winner of the drill is the first team to 7.
The purpose is to simulate scoring quickly in early offense before the entire defense is able to get back.
If you run this drill correctly, you can expect to improve your players’ abilities to read the defense. A secondary benefit is that your screening and ability to use screens will improve.
You should also have one of your coaches work with the defense on communicating and defending cutters.
Set the drill up to work on the screening actions that you run and/or those that you have to defend.
See more about this drill by clicking here.
Villanova Pressure Release and Finish Drill
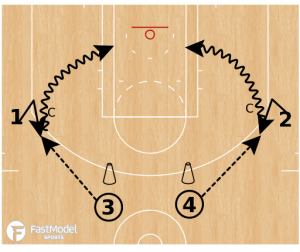
The Cs in the diagram are coaches what are guard 1 and 2.
Players get open by stepping across the feet of the defenders and “posting up” on the wing.
Passers work on passing to the outside hand of the receiver which is away from the defense. Receivers pop out to meet the pass as it is released. On the catch, 1 and 2 face the basket in triple threat. The drivers practice steps and low rip throughs to drive to the basket.
In order to be strong at the rim and to finish with contact, players will work on a two foot jump stop. If the player is trying to get the shot off quickly they should go off one foot. One foot for quickness, two feet for power.
Click here to see more details about this drill.
Unique Team Shooting Drill
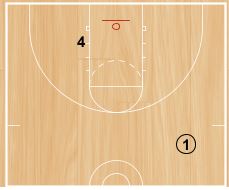
This shooting drill is from Arkanas Women’s Coach Mike Neighbors Newsletter. Might give you some thoughts on some ways to offer some variety in your practices.
This post was created when Coach Neighbors was at Washington.
Softball Plus One Shooting Drill
This series is more about the application than the actions. You need to make the actions fit your offense. I will give you one example that we use in each round, but the magic is in making them breakdown your offensive actions and simulate your games.
See the rest of this drill here.
Shooting/Scoring Improvement Basketball Drills
8 Individual Shooting Drills
Make Ten Without Missing Two in a Row
- Move at a game pace.
- To win the drill, hit ten shots before you miss two in a row
- Shooter spins the ball out to themselves to simulate catching a pass from a teammate. Spin passes from angles and court locations that simulate the passes that the shooter receives in games from your team’s offense.
- You can also catch the pass, make a shot fake and use an escape dribble to get way from your imaginary defender.
See the remaining seven individual shooting drills like this one by clicking here.
4 Team Shooting Drill
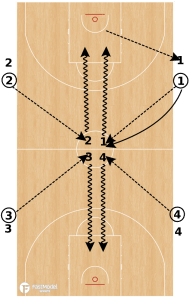
This drill is utilized by Fabian McKenzie
Teams line up as indicated by the diagram.
The players in the center jump circle are not allowed to leave until they catch the basketball.
When #1 receives the pass, he/she can dribble in for a shot.
The passer follow the pass into the center circle.
Select spots and add live ball dribble moves to the drill to simulate game conditions.
The shooter rebounds own shot 1 and makes an outlet pass to their team’s line.
You can specify a number of shots that the winning team must reach first, or you can put a time on the clock and the team with the most shots made at the end of the time is the winner.
Click the link to see the entire post of the 4 team shooting drill
Basketball Drills: 6 Shot Shooting
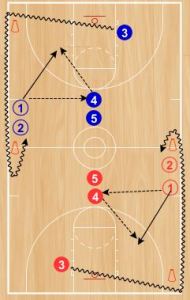
This drill is courtesy of Coach Mike Neighbors.
1 and 2 start the drill with basketballs, 3 is a rebounder. 4 and 5 start in the middle of the floor as passers.
1 passes to 4, then cuts to the bucket. 4 passes back to 1 for a shot. Player 3 should rebound the basketball without letting it hit the floor. After the shot, 1 sprints to the end of the passing line. After rebounning, 3 dribbles full speed around the cones and continues to the end of the shooting line. 4 becomes the rebounder after passing.
The winner of the first round is the first team to make 20 shots(red or blue).
One player from the winning team immediately goes to the free throw line to validate the win.
If the free throw is missed, the team does not get credit for winning. Validation is a great thing to add to any of your drills to practice free pressure free throws when tired.
To win the drill, one team must win 3 rounds. Winning a round is only good if the team makes the validating free throw.
Change the types of shot you are shooting each round. Use the types of shots each round that you shoot in games. Here are a few suggestions. (Any drill is really only effective if you use shots that you get in games.)
1) 1 foot layup. Shoot off of one foot when you are trying to get the ball off before the defense has a chance to block it.
2) 2 foot power layup. When you need balance and strength in traffic.
3) Catch the pass and shoot mid range with no dribble.
4) Catch, rip through, one dribble pull up two point mid range shot.
5) Change of direction cut into a jump shot
6) Catch and shoot 3 point shot
Check out the rest of this drill.
Our 3 Most Popular Transition/Conversion Basketball Drills
To keep communication and terminology clear for our players, I define conversion as going from offense to defense. I define transition as going from defense to offense.
Defensive Conversion Drill
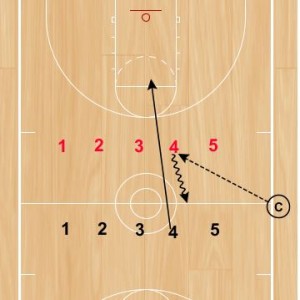
Two teams of 5 players line up 10 feet off the half court line facing each other. In the diagram, it appears to show that the black team is closer to the time line, but both teams should be 10 feet away from the 10 second line. The teams should be facing each other.
The coach has a basketball and is standing out of bounds at the midcourt line. The coach can pass the ball to any of the ten players.
The team that receives the ball attacks the defense.
The player opposite the player who caught the ball sprints to touch the paint on the opposite end of the direction that the ball is going, then catch up to play defense. Offense has a temporary 5 on 4 advantage which they look to exploit. Defense must rotate and cover up until the 5th player is able to get back into the play.
Find out more about this defensive conversion drill here.
“Never Too Late” Drill
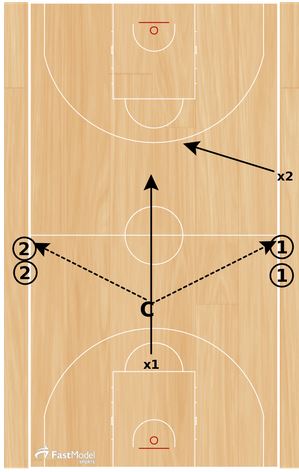
Another drill from Fabian Mckenzie of Cape Breton University Women’s Basketball.
Offensive is positioned at the 10 second line.
X2 can be placed anywhere on the floor depending upon the angles and timing that the coach wants to create for when the defender will pick up the dribbler.
X1 begins at the free throw line behind the play.
Coach has the option to pass to either of the two offensive lines.
X2 comes in to slow the basketball in conversion. X1 sprints to catch up to make t.
For scoring purposes, players should be split up into squads of 2. The pair gets 1 point for a score and 2 points for a stop. That incentivizes players to attack the basket in transition. If you like to shoot 3s in transition, you might need to change the scoring to fit your style of play.
You should also limit the time on offense. In a game, the 2 on 2 doesn’t last long before other players become involved. I think it is better to teach them to take no shot rather than force a bad shot to beat the time allotted for 2 on 2.
Want more info on this drill? Click here.
Quick Strike Transition Drill
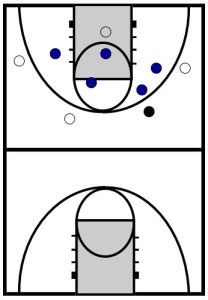
The drill emphasizes the following: shot selection, decision making, eliminating turnovers, offensive transition, and defensive conversion.
Put 15 seconds on the clock. The offense earns points based on how much time is left on the clock when they score. For example, if they score with 8 seconds remaining, they get 8 points. White is now on offense and blue is on defense. If blue doesn’t score, there are no points awarded.
The quicker the offense can score, the more points they earn. The longer the defense can delay the offense from scoring, the better it is for them as they are limiting their opponent’s points.
One decision you must make is how you will fit fouls into your scoring system.
Once the 15 seconds is up, start the clock again at 15 seconds and continue with the team that has the ball.
Get the second part of this drill called “Milk the Clock” by clicking here.
3 of Our Top Competitive Basketball Drills
Competitive 31
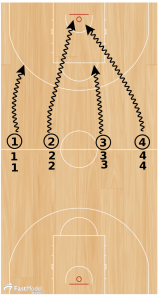
There are 4 teams in this drill. They are divided by the numbers 1-4 in the diagram.
Put one minute on the clock. When the drill begins, each player who is first player in each line dribbles in and chooses the type of shot.
A made 3 point shot counts as 3 points for that team. A made midrange two point shout outside the lane is worth 2. A made layup is worth 1 point.
Each player only gets one attempt. Make or miss, the shooter rebounds their own shot and passes back to the next teammate in line.
The first team to reach 31 wins the drill.
See the whole drill by clicking here.
Competitive Defense
In order to win this drill the defender must properly execute the following defensive skills: defensive vision, floor positioning, anticipation, closing out, guarding in a one on one situation, blocking out, and securing the rebound with two hands.
The drill begins with the players positioned as shown in the diagram. x3 is guarding player 3. Players 1, 2, and 3 are on offense. Player 1 has the basketball and shoots to start the drill. Offensive player 3 crashes for the offensive rebound. x3 blocks that player out and chins the rebound with two hands. x3 then passes the ball back to the original shooter, player 1.
Player 1 then swings the ball to offensive player #2. X3 executes a closeout on 2. The expectation is to arrive at 2 on the catch to take away the open shot. If 2 cannot get the shot off, the players go one one one. Goal is for defender to keep ball out of lane and force a pull up jump shot that is contested, then get the rebound with two hands.
Thanks to Randy Brown, retired Assistant at Arizona and Iowa State, for this drill.
Want to see all frames and more details for this drill? Check it out here.
145 Layups in 4 Minutes
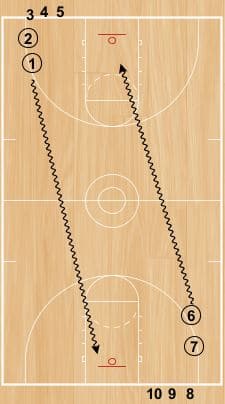
I picked this drill up from Dean Lockwood, Assistant Women’s Coach at Tennessee.
The first time you run the drill start at 1:00 and work your way up to 4:00 minutes. For one minute you should make 40 layups. Adjust the number made to win and the time you run the drill for to your team’s ability.
One day run the drill dribbling with the right hand and shooting right handed layups. The next day dribble and shoot left handed. Or, stop the drill for a halftime and switch from right to left handed layups.
Split the squad up and start with two balls with each group.
For the diagram, the players in circles have the four basketball to begin the drill.
Players are allowed 4 dribbles to get the other end to teach them to cover as much ground on each dribble as possible. If you are coaching a younger age group, you can decide to use 5 dribbles.
As soon as the ball goes through the net, the next player in line heads towards the other basket.
Learn more about this drill and others like it here.
3 of Our Top One on One Basketball Drills
Louisville One on One
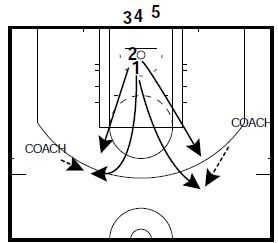
Zak Boisvert, www.pickandpop.net
The coaches on both free throw lines extended start with a basketball.
Player (1) is on offense and can cut to either slot (the intersection of the free throw lane extended and the 3 point arc. In this diagram, the NBA 3 is used) to receive a pass from the coach on that side of the floor.
2 is the defender. 2 trails the offense and defends 1 live when the catch is made.
Rules for the drill:
1. Maximum of 3 dribbles per offensive possession.
2. Offense can pass to either coach and cut to get a pass back from that coach. Dribble do not start over. If Player #1 dribble twice then passes to a coach, he or she only has 1 dribble to use when the coach passes back.
3. The winner of the possession is the offense if they score, get fouled, or get an offensive rebound. The defense only wins on a stop without fouling.
4. Winner of the possession passes the ball back to the coach. The loser goes to the end of the line. The next player in line steps up and the drill runs again.
5. Each time a player scores, they get one point. Play to 5.
You can tweak any rule or the scoring system in any way that will help your players improve.
Click here for 3 more one on one basketball drills shared by Coach Boisvert.
Spanish 1 on 1
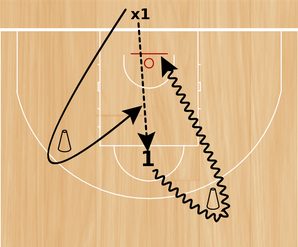
Fabian McKenzie, Cape Breton University Women’s Basketball.
Run this drill from several spots on the floor to work on scoring and defending from various angles. Select offensive angles that your players have driving opportunities from in your system. To work on defense, put defenders in angles that give you difficult closeouts.
Some coaches like to point out that cones are not present on the floor during a competitive basketball game. That is true. The cones are simply markers to have the players run around to create a more game-like feel to developing one on one offensive and defensive skills.
The defense (x1 in the diagram) starts with the basketball. For this version (angle) of the drill they start on the baseline. You will need to decide on the best place to start the basketball as you play from various other areas on the court.
The drill starts when the defense passes the ball to the offensive player–1 (located at the free throw line) in our diagram.
After catching the basketball, 1 dribbles around the cone. The defense sprints around their cone, then defends 1.
You can also adjust the distance from the players’ starting points to their cones depending on whether you want the defense to have a chance to get in front of the offense. Or, if you want the defense to end up chasing from behind. That decision will also impact the way you score the drill.
Want more drills like Spanish One on One? Click here.
Closeout One on One Drill
This drill was posted by Coach Randy Brown in FastModel’s library.
Toughness and execution are the features of this three point close out drill. The goal is for the offensive player to get an open three point shot at the top of the key.
The defender’s mission is to take the shot away. If he is successful they play 1 on 1 until a foul, basket, or defensive stop occurs.
Drill starts in these positions. 1 has to start in jump circle in the back court. On “Go” X1 sprints to touch baseline and out to close out on ball.
Goal for 1 is to drive the ball just above top of key and shoot uncontested three point jump shot. X1 goal is to closeout and take away the three.
Get more details on this drill.
2 of our Top Sureness Drills
Sureness drills are drills that improve your players skills with the basketball that will lead to a reduction in turnovers.
5 Lane Passing Drill
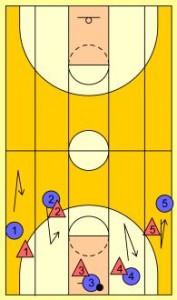
This is one of my favorite basketball drills.
The purpose of this drill is to work on getting open, passing, catching, spacing, and being tough with the basketball while facing relentless defensive pressure.
My belief is that coaches do not emphasize and drill to give players the skills to get open against pressure.
Since the drill involves 5 lanes, and 10 players, emphasizing spacing is crucial.
The team that wins the drill is the one that takes the least amount of time to get from the baseline to half court.
Basketball rules apply. If there is a turnover, defense and offense change. Give each squad three possesions. Team with the lowest time from baseline to half court in their three possessions wins.
Another way you can run the drill is to run it 3 on 3 in 3 lanes rather than in 5 lanes.
See more diagrams like this one by clicking here.
Triangle Ball Toughness Drill
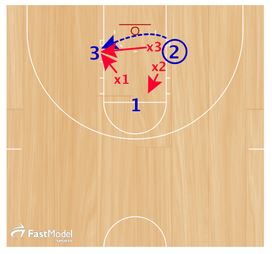
This post was created by Kyle Gilreath.
x1 and x2 trap 1.
1 must be strong with the ball trying to pass to 2 or 3.
1 must utilize pass fakes to lead x3 and pass to the open man.
If 1 passes to 2, x2 and x3 become the new trappers.
Drill continues until the defense gets a deflection or causes a turnover.
Get more details on this Triangle Ball Toughness Drill here.
Implementing These Basketball Drills Into Your Practices
Once you have selected the basketball drills that will give your players the best opportunity to improve, I recommend segmenting your practice drills into the following 4 periods.
Segment 1 Individual Offensive Skill Development Drills. The drills you use in this segment would be drills to improve players’ shooting, dribbling, passing, catching, cutting, and finishing at the basket.
Segment 2 Team Defensive Regardless of the type of defense you play, set them up so that players are working on guarding the types of movements that their opponents will make in games.
Another key component of your defensive drills in this segment should be to create “overload” drills. Overload drills make it tougher in practices on the players than it would be in games. To accomplish that, overload basketball drills force players to execute perfectly before giving credit for completion. By playing small sided games such as 3 on 3 you eliminate the defense being able to rely on help, and create an overload situations. Similar situations are to playing 3 guarding 4, or 4 guarding 5.
Since you convert to defense on all live ball possessions, I believe it is best to include defensive conversion in all defensive drills. You don’t always have to go full court to accomplish that. You can simulate conversion by starting all players at half court rather than just lining them up and starting from your offensive formation.
Segment 3 Team Offense I believe that spacing is a crucial part of offense, and that is taught best through 5 on 5 drills. Regardless of what team skill you are practicing, if you don’t account for occupying the help defenders and giving the ball handler an outlet when he or she is in trouble, your offensive breakdown drills will not be equipping your players to play in 5 on 5 games.
Segment 4 Competitions and SituationsThis is the time to play a 5 or 8 minute segment like a game. But, you can make special rules that allow your team to improve. Examples are, not chinning a defensive rebound is a turnover and gives the ball back to the team that just shot. Not challenging a shot counts as a make even it it doesn’t go in, or a deflected pass is a turnover, even if it is caught by the offense. The key to making special rules in your basketball drills and scrimmages is to make sure that your players understand their purpose and see how they will help them improve. This is also the best time to rehearse situations that occur throughout the game such as end of shot clock, end of quarter, end of game down 2 with 10 seconds and an under out, saving loose balls, etc…
