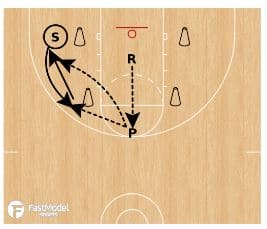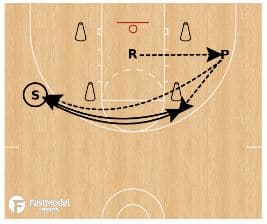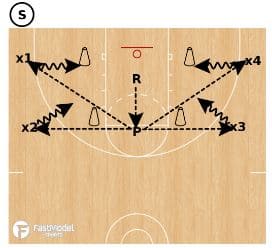
• Skip to primary navigation
  • Skip to main content
  • Skip to primary sidebar

  • Basketball Plays
    • Ball Screen Sets
    • Horns Sets
    • Man to Man Post Up
    • Man to Man Isolations
    • Backdoor Plays
    • Man to Man 3 Point Shot Plays
    • 2-3 Zone Attack
    • Baseline Inbound Plays
    • Sideline Inbound Plays
    • Combination Defense Attack
  • Drills
    • Defensive Drills
    • Offensive Drills
    • Competitive Drills
    • Passing Drills
    • Rebounding Drills
    • Shooting and Scoring Drills
    • Toughness Drills
    • Transition & Conversion Drills
    • One on One Drills
  • Blueprint
  • Practice
  • Mental Toughness
  • Skill Development
  • Offense
  • Defense
  • Store

Basketball Drills

Basketball Drills: Multi-Purpose Drills

By Brian Williams on September 15, 2016

 
Some drills that you can use in several ways: Warm-up, Shooting, Passing/Catching on the move, or at the end of practice for Conditioning/Competitions/Toughness

These drills are from Coach Justin Remington.

I have a link at the bottom of the post for you to access the entire pdf of his Favorite Practice Drills.

Full Throttle Shooting Drill

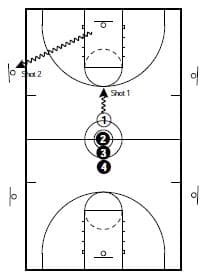
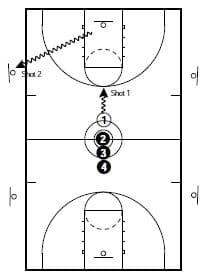
throttle-shooting1

Everyone on the team has a basketball and start at half court. Each player will take the same shots.

1st person dribbles hard to the TOK and takes a TOK three pointer (second person waits until the ball is rebounded before they go and take same shot, each person on the team follows suit) (Shot 1).

Once player gets a rebound they go to the basket to the left for a right handed layup (Shot 2).

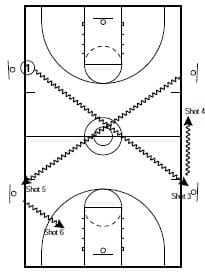
throttle-shooting2

Player speed dribbles across the court (push the ball ahead of you, limit your dribbles) for a left hand layup (Shot 3)after rebound player sprints to the right side basket for a short corner (or corner three pointer) shot (Shot 4). Player gets rebound and speed dribbles diagonally for a bank shot above the block (or a reverse layup depending on what you want to see that day) (Shot 5).

The last shot is a wing 15 footer or a wing three pointer (depending on what you want) (Shot 6) (have players go through these 6 shots two or three times and count their makes and report their makes to you after the drill)

Editor’S Note. You could turn this into a team competition by seeing how many the team can make in a specific amount of time.

Relocation Layups

You could change the shot to a 3 jump shot, have someone at the basket to contest the layup, or change the type of finish to add another level of difficulty to the drill or for some variety.

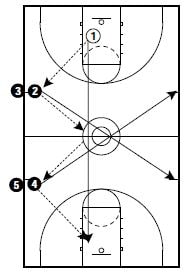
relocation1

This is a timed drill, Put two minutes on the clock and select an amount of layups you want to see made. Players do not reach it they get a sprint added under TEAM FOULS (to be run later in practice)

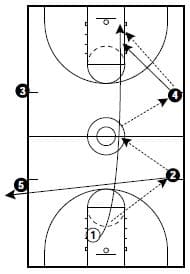
1. Team lines up on sideline as shown

2. Player with basketball under the rim throws the ball off glass and outlets to 2

3. Player 1 runs the lane, player 2 passes back t o player 1 and cuts diagonally across the floor to the opposite sideline

4. Player 1 passes ahead to 4, 4 passes it back to 1 who will shoot the layup

5. Player 4, after the pass back to 1, will cut diagonally across the floor (as shown)

relocation2

1. Player 1 gets rebound and outlets to 2

2. Player 2 passes back to player 1 and sprints across the court and gets into line behind 5.

3. Player 1 continues and passes ahead to 4

4. 4 passes back to Player 1 and follows player t o the basket to get rebound

5. Player 1 finishes and Player 4 rebounds and goes back the other way to repeat the process.

Coach Remington has a 54 page pdf assembled with Moreno Valley’s Favorite Practice Drills. You can access it by clicking this link: Moreno Valley Practice Drills

Chris Mack Defensive Drills

By Brian Williams on September 12, 2016

These are some notes from Chris Mack, Head Men’s Coach, South Florida.

Regardless of what you run on offense or defense, you must have a defined system you believe in
– Your team must have an identity
– Everyone in your league should know what you’re about

– When you have a system, it gives your players answers and accountability to what they’re doing. For example, we don’t give up baseline – if you give up baseline you understand you’re coming out of the game
– It simplifies scouting. Identify the common offensive actions you face and teach a standard way to defend. Start at the beginning of the season practicing these actions in your shell drill. This allows you to focus on your opponent’s offensive concepts (rather than detailed set plays) when going over the scouting report.

– Your system should create “Regenerative Learning” (Tony Dungy), where upperclassmen can teach underclassmen.

Why play the Pack Line?:
– On offense, kids are way better ball handlers and way worse without the ball in their hands compared to 20 years ago.

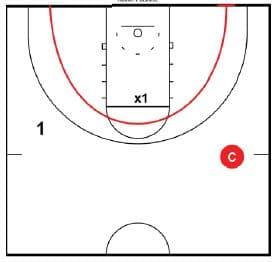
packline2

There is nothing “soft” about Xavier’s Pack Line:
– Aggressive
– Ball pressure
– Smart positioning off the ball

What is the Pack Line Defense Philosophy?

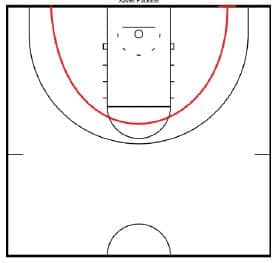
– 16-17’ from the basket, mirrors the 3 pt line
– Tape it down every day before practice

Rules
– GOLDEN RULE: You must have two fee inside the PL when your man does not have the ball. Only two exceptions:
Your man becomes a cutter or Your man becomes a ball screener
– On-ball defender must play with extreme ball pressure
– On-ball defender CANNOT get beat baseline under any circumstances, nor can he get beat in a straight line (from a poor close out). It’s all about what you emphasize: A Xavier basketball player WILL NEVER get beat baseline – this  is nonnegotiable!

Close Out
– One of the most important fundamentals to this defense! You must work on this every single day (including pre-game warm-ups)
– Xavier Way: “Close out with two high hands”  Why “two high hands” instead of one?  Discourages rhythm shots and quick passes over the top Creates a mentality to “take away vision”

Diagrams created with FastDraw

Drill: “VEGAS CLOSE OUTS”

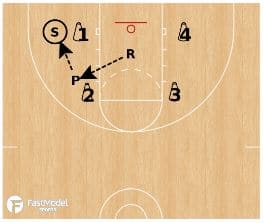
packline3

– We do this drill every single day (practice, shoot around, pre-game warm-ups, etc.)
– Each defender tosses the ball to offensive player
– Xavier Way to close out: 2 High hands, Elbows bent, Low stance, Short/choppy steps, Stay square, Yell “SHOT” early
– The offense will catch, triple-threat, jab step and rip the ball through a couple of times.
Drill: “BLACKHAWK”

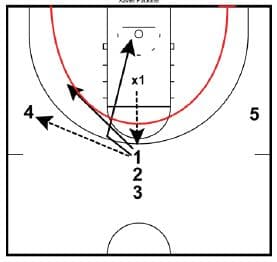
packline1

– Great drill that incorporates closing out, ball pressure, jumping to help position, fronting cutters, and closing out from help position.
– ***Closing out from a help position is one of the toughest fundamental to master defensively***

    • x1 throws ball to first offensive player (1) inline and close out
    • 1 can pass to either wing, x1must “jump and swipe” to get to appropriate help position, 1 basket cuts, x1 must use arm bar and “bump cutter” to the logo (below the FT line)
    • Wing will pass to next offensive player in line (2), x1 must close out again – this time from a help position
    • After two or three passes from wing to top to wing back to top, the Coach will yell “LIVE”
    • Two players play 1-on-1 off the close out
    • Offense has 2-3 dribble max to score
    • x1 must get a stop to complete the drill – if offense scores, x1 restarts drill
    • Coaching Points Make sure x1 keeps proper fundamentals during the dummy period of the drill

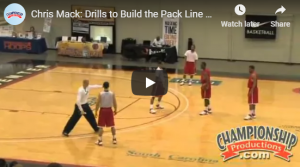
This is a video of the Blackhawk Defensive Drill

Click the play arrow to see the drill and make sure your sound is on.

There is nothing to purchase to see the drill, however if you are interested in see more about the DVD that it came from, you can use this link:

Chris Mack Drills to Build the Packline Defense

Drill: “2-on-1 Position”

packline4

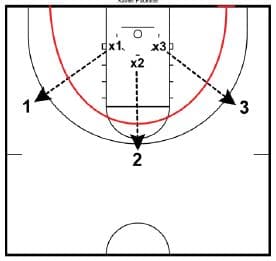
– Coach starts with the ball, x1 is matched up with 1
– Coach can pass to 1, dribble him out, cut him through, etc. forcing x1 to play on and off the ball
– Drill lasts for a prescribed amount of time, no one looks to score – just focus on constant offensive movement
– Coaching Points:
o Make sure x1 plays with proper fundamentals throughout the drill:
o Close outs from ball to help & help to ball
o Jump & Swipe
o Bump Cutter
o Protect against baseline & straight line drives
– Intense ball pressure

Basketball Drills: UNO Shooting Drill

By Brian Williams on September 10, 2016

 
This shooting drill was diagrammed and contributed by Joel Hueser to the FastModel Sports Basketball Plays and Drills Library.

This is what he said about the drill:

We are big fans of a UNO (University of Nebraska Omaha) shooting drill Coach Derrin Hansen shared with us. Throughout the course of the summer and fall, many of our players will do this drill 2-3 times a week if not more.

When it’s all said and done, each player will have made 100 shots (80 field goals and 20 free throws). The workout can be finished in 20-25 minutes depending on age, skill level and intensity. We like the variety of game-like conditions presented in this workout: shooting, passing and rebounding.

You can modify the drill to shoot more 3s if that is what you are looking for. There are 2 videos of players executing the drill below the diagrams.

The drill has 3 phases.

To complete each portion of the drill, the players must make the specified number of shots. Have the rebounder count out loud how many they are shooting after each shot attempt. Example: 1 for 2, 2 for 3, 3 for 4, 3 for 5, etc…

Phase #1: 4 Spot Shooting (40 Made shots–32 FGs 8 FTs)

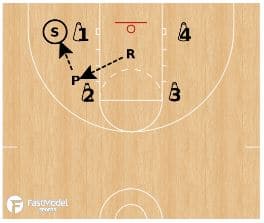
basketball-drills-uno-shooting

Shooter makes 8 from spot 1 (cone).
Shooter then makes 2 free throws.
Passer rotates to Shooter and Rebounder to Passer.
Repeat until all 3 players have shot from all 4 spots (cones).

Points of Emphasis:

-Be shot ready.
-Good pass equals a good shot.
-3 players and 2 balls are needed for this drill.
***Coach Derrin Hansen of University of Nebraska-Omaha deserves the credit for this shooting drill***

Phase #2 Back & Forth (40 Made shots–32 FGs 8 FTs)

basketball-drills-uno-shooting2

Combo 1: Shooter cuts back & forth from spot 1 to 2 (corner-elbow) and makes 8.
Shooter then makes 2 freethrows.
Passer rotates to Shooter and Rebounder to Passer.
Repeat until all 3 players have shot.

Points of Emphasis:
-Get your homework done early (we emphasize inside step).
-Game speed.
-Overhead pass when the shooter moves away from the passer.

basketball-drills-uno-shooting3

Combo 2: Shooter cuts back & forth from spot 2 to 3 (wing-elbow) and makes 8.
Shooter then makes 2 free throws.
Passer rotates to Shooter and Rebounder to Passer.
Repeat until all 3 players have shot from all 4 combos.

Points of Emphasis:
-Combos 3 & 4 are the same on the opposite side.
-Shooter should always land 6″ forward.
-Mastery of the overhead pass!

Phase #3 Around the World (16 FGs 4 FTs)

basketball-drills-uno-shooting4

Round 1: Shooter moves around the arc and makes 8 from the 4 spots off the catch (no dribble).
Shooter then makes 2 freethrows.
Round 2: Shooter moves around the arc and makes 8 from the 4 spots off the dribble (1-2 bounces).
Passer rotates to Shooter and Rebounder to Passer.
Repeat until all 3 players have done both.

Points of Emphasis:
-Shooter should catch outside the arc relative to the 4 spots.
-Utilize blow-by and crossover moves.
-Drive the ball; don’t dribble it.

Here are a couple of You Tube videos with players going through the drill:


Make 2 Before Missing 1 Shooting Drill

By Brian Williams on August 30, 2016

These two shooting drills are among the thousands of resources for both coaches and player available from basketballhq.

They have several more videos as well as basketball coaching resource articles.

BasketballHQ has just released their Basketball Coaches Training Group. In the group you will get access to different workout plans that are going to be for the team as a whole, by position, by the number of players and more. This is an all inclusive training group that is going to allow you to walk onto the court with a full workout plan in hand for your players through our easy to use Iphone and Android App. Every drill comes with a video breaking down the details of the drill, and all of the videos are instructed by a Pro or College coach and demonstrated by a high level player. click here for More Information on the Basketball Coaches Training Group.

I have posted a sample from the Coaches Training Group below the second video.

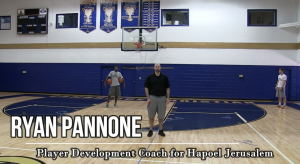
The drills are coached by Ryan Panone.

I encourage you to think about the best way to tweak the drills before you implement them so that they offer the most benefit for your players.

Even as you are first implementing them, you may need to continue the process of making some adjustments so that they are contributing to the improvement of your players.

Make sure that your speakers are on to hear the narration and that you can access You Tube to see the videos.

Click the play arrow to begin each video.

Make 2 Before Missing 1 Shooting Drill

Double or Nothing Shooting Drill

Here is a 2:00 minute sample of the type of content that is available in the BasketballHQ Coaches Training Group.

Half Court Hustle Rebounding Drill

By Brian Williams on August 25, 2016

The following offensive rebounding drill is provided by Coach Jamy Bechler. Coach Bechler has coached several teams that have achieved several national rankings for rebounding. During the 2013-’14 season, they led the nation in Rebounding Margin (+19), Rebounds per Game (55 rpg) and Offensive Rebounding Average (21/game).

They were among the NAIA’s Top-10 in each of these categories in all of Coach Bechler’s years at Martin Methodist College. While at Bryan College, Bechler’s teams were known for their toughness and rebounding. In his three years, the Lady Lions finished in the NAIA’s Top-10 for Rebounding Margin culminating in an incredible +18 rpg average during the 2009-2010 season.

The statistics show that more field goals are missed than made, so the philosophy he instills is that “every missed shot is a pass to me.”

The drill below is a sample from his Championship Rebounding Video.

You can find out more about the video at this link: Championship Rebounding

This is a vimeo video, so make sure that you are able to access that network. Also, please make sure your sound is on for the instruction with the video.

Competitive Drills Part 2

By Brian Williams on August 18, 2016

These are some of the notes presented by Dean Lockwood. Dean is currently the Associate Head Women’s Coach at Michigan State.

He was an assistant in the Tennessee Women’s Program for 15 years.

He was also an assistant in their men’s program for 5 years. In between those stints at Tennessee, he has been the men’s head coach at Saginaw Valley State, and Northwood University.

Thoughts on Competitive Practices 2

This is the 2nd part of my notes. You can see the drills and thoughts that I posted last week at this link:
Tennessee Competitive Drills

Have 2 areas of emphasis each practice and hold players accountable for them. Have a full rack of basketballs on the sideline. Each time one of the areas of emphasis is not followed through on, take a ball of the rack. When the rack is empty, the team runs. You can use it for any area, but as an example, Eliminating Turnovers is the emphasis for the day. Each time a turnover is committed, remove one ball from the rack. It is also a powerful visual teaching emphasis.

It’s not what you teach, it’s what you emphasize (old Don Meyer favorite)

Making layups and free throws are keys to being good. This drill is also a conditioner.

(Teaching point for layups: No defense, jump off 1 foot. With defense, shoot a two foot layup for power and balance.

Make 145 layups as a team in 4 minutes drill
If you do 2 minutes, the target number made is 75
(You can adjust the number made or the time for your level and your team’s ability level.

(Editor’s note from Brian) You might also consider shooting left hand dribbles and layups. You could also run the drill by using a pad to make contact with the shooter as he or she goes in for the layup. Experiment a couple of times to see what is a good standard of makes for your players to shoot for.

layups

Diagrams created with FastDraw

As in, the diagram, start half of the players at each end. 2 basketballs at each end.

In the diagram, players 1, 2, 6, & 7 are circled and start the drill with basketballs.

Each player has 4 dribbles to make it to the far basket at other end to shoot a layup.

Put 4 minutes on the clock.

When the clock starts, 1 & 6 start their 4 dribbles toward the other end. When they are at half court, 2 and 7 start their dribbles. 3 will rebound 6’s layup then start their 4 dribbles to the other end, and 8 will rebound 1’s layup and start their 4 dribbles toward the other end.

Pass Ahead Contact Layups

pass-ahead-layups

Making layups is one thing, making layups with contact is another.

Work on both sides of the floor and finishing with both hands.

You can make cuts from your half court offense or simulate a player catching a pass in transition.

Player 2 cuts to score, 1 makes the pass to 2.

2 can use one dribble to score.

As soon as the basket is made or missed, the next cutter is up-no wasted time.

Coach at basket with pad to work on the player finishing through contact.

Make the drill competitive by having it going at both ends. The end that converts the most layups in a certain amount of time is the winner.

Circle Transition Drill

Can do the drill 4 on 4 or 5 on 5. Split players into two teams with different color jerseys. Alternate players by jersey colors and have them run in a circle around the key and free throw line area at one end. Throw the ball somewhere on the side of half court where players are. The team that retrieves the loose ball is on offense and looks to fast break to the basket at the opposite end. The team that did not get the loose ball is on defense. They must talk and match up, then play your rules for converting to defense, stop ball, protect the basket, whatever you teach. Play continues like a game until one team scores. Then, reset the drill with the circle rather than inbounding the basketball after the made basket. Play to a set score, or for a set amount of time.

Mountaineer Drill

Split players into 2 teams with different color jerseys. Red vs. White

Keep score like a game for both sides, free throw, 2 pt. shot, 3 pt. shot.

Each team has it’s own basket, like a game.

Start the drill with 1 red player shooting a free throw, 2 white rebounders, and no one else on the court. Just like a game, if the free throw is made, red gets one point.

Make or miss the free throw, white goes the other way 2 on 1 with the ball vs. red. They get the points 2 or 3 if they score

When the 2 on 1 ends, 2 reds come on, making 3 reds, they go the opposite way 3 on 2 vs. the 2 whites.

(Whenever there is a change of possession, play it live like a game, the new players come on on the fly like hockey. The drill does not stop once the free throw is shot)

When the 3 on 2 ends, 2 whites come and go 4 on 3 towards the white basket vs. the 3 reds.

When the 4 on 3 ends, 2 reds come on and go back 5 (reds) on 4 (whites).

When the 5 on 4 ends, 1 white comes on and the go the opposite way 5 on 5.

Each team has 3 possessions.

Start the drill again with white shooting the free throw for the next round.

Play 4 total times, or adjust that number if you need more trips to get all players involved.

  • « Go to Previous Page
  • Page 1
  • Interim pages omitted …
  • Page 45
  • Page 46
  • Page 47
  • Page 48
  • Page 49
  • Interim pages omitted …
  • Page 97
  • Go to Next Page »

Primary Sidebar

  • Twitter
  • Facebook
  • Linkedin
coachestoolbox
personaldevelopmenttoolbox
basketballplayerstoolbox
basketballtrainer
athleticperformancetoolbox
coachingbasketball

© Copyright 2026 Coaching Toolbox

Privacy Policy