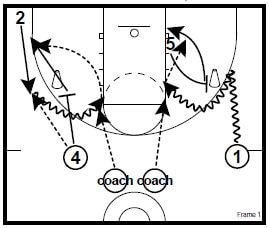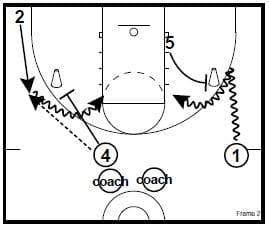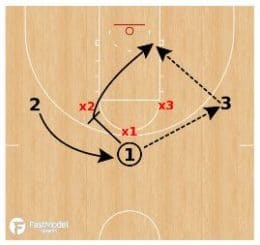
This 3 on 3 basketball drill was diagrammed and contributed by John Leonzo of Cedarville University to the FastModel Sports Basketball Plays and Drills Library.
You can also find out more about FastModel Play Diagramming software by clicking this link: FastDraw
Editors’ Note from Brian: I like the idea of establishing special scoring rules in your drills and in your 5 on 5 play that reinforce the things you will need to do to be successful.
I hope this drill gets you thinking about rules that you can incorporate into all drills and scrimmages your practices to emphasize your coaching points.
These rules force your players to not waste dribbles and to space behind the arc.
Scoring the drill by 2s and 1s puts an even greater premium on 3 point shooting.
If you would rather not do that, you can go to 15 by 2s and 3s.
I have included some thoughts on utilizing special rules in your practices below the diagrams of the Wildcat 3 on 3 drill.
I do not recommend using too many rules, it disrupts the flow of the scrimmage when you award points. Pick 3 at most each day that fit the way you play. It could be a different group of 3 the next day.
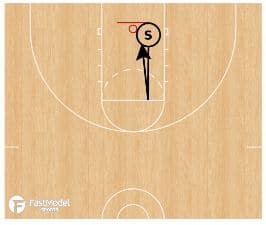
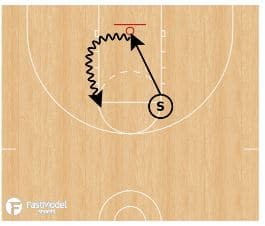
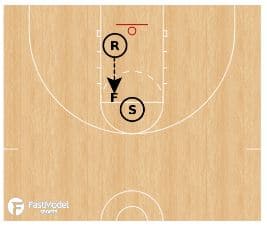
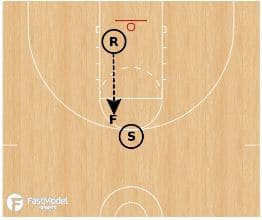
Play live 3v3 but with the following rules.
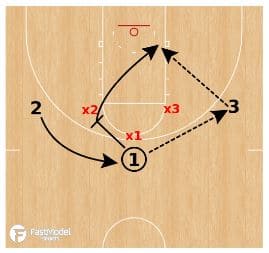
Rule 1: Any dribble that does not attack or break the plane of the 3 point line is a turnover.
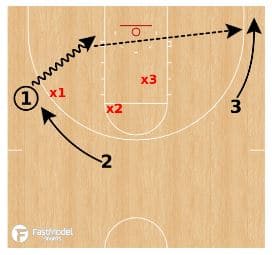
Rule 2: The only place the ball can be caught is on a cut to the rim or behind the 3pt line.
Play make it take it to 10 by 1s and 2s.
It is often very challenging to create competitive drills and scrimmages between your first and second teams. There is a way to allow the players in your rotation to play together and in their roles and still force the first team to compete like they would have to in a game.
To produce the needed challenges for your first team, make special rules in practice that cause the them to be challenged by you as their coach and the scoreboard when the second group is not physically able to provide that challenge necessary for improvement.
Some years your starters will need more challenges to push them than others. So each year, revisit what you are doing with your special rules and make adjustments and adaptations that fit your current team. The rules should make the scrimmages competitive so that with their implementation, the second team has the opportunity to score more points and win the scrimmage, which forces the starters to compete. This serves to make your practice much more competitive which is crucial to the improvement of your team.
Make the rules fit your offensive and defensive systems and goals for each game. For example making a rule that every time the second team makes a pass in a scrimmage counts as a point for them is great if you are working on playing a pressure man to man defense that denies all passes. But, makes no sense if you are a team that plays a zone or a packing man to man where you don’t pressure the non penetrating passes. A better rule for a defense designed to keep the ball out of the middle is that each time the second team gets the ball in the paint; it is a point for them.
Your players must understand the purpose of the rules. It must make sense to the players as to how your rules will develop practice habits that will carry over to games. Players don’t have to agree with everything, but if they see a method to your madness, there is a much higher likelihood that your system will produce the intended results.
Make the rules should be simple to implement and easy to track. They should not interfere with the flow of the scrimmage by causing the players and the coaches to have to slow down to figure out what just happened and how that affects the score.
Run the clock and the scoreboard like a game when you scrimmage in practice. Make every special rules violation either result in a turnover, adding points to the score of the second team, or both. It is too difficult for the individual who is keeping score to take points away from a team. If you just yell, “Two points for the red team because the white team did not chin the defensive rebound,” the players know why the points were lost and the manager can just add them to the score of the second team. The point differential is the same regardless of whether you add to the second team’s score or subtract from the first team, so it makes sense to make it easier on your scorekeeper. If you have enough managers or assistant coaches, keep a possession chart and record what violation resulted in the points so that you can analyze what rules you are violating the most frequently and then work to improve those areas. If you don’t have access to a scoreboard, you can still designate a coach or manager to keep a possession chart on a clipboard and call out the score.
Here are some suggestions for special rules. The key is to keep them pertinent to how your team plays and to make practice scrimmages competitive.
• 2 points to second unit for a shot that isn’t contested by the first team, regardless of whether it goes in or not.
• Regular rotation players cannot dribble.
• Any foul by first team is automatic 2 points for second team.
• Every turnover by 1st team is 2 points for the 2nd group.
• Anyone on the first team not chinning a rebound is a turnover—loss of possession and the two points that are the result of every turnover.
• If a player takes an unacceptable shot, for us that is anything except an open jumper or power shot inside, award two points to the defense.
The purpose of the rules—to make practices competitive–must be understood by all of your players. Most second units can’t match the first team in size, skill, and experience the way that the other schools you play will. It keeps them from getting away with mistakes that will cost them on game night and allows your reserves some hope of winning your practice scrimmages.

Click here for information on my basketball practice e-book “130 Great Ideas to Get a Lot More Accomplished in Practice”