• Skip to primary navigation
  • Skip to main content
  • Skip to primary sidebar

  • Basketball Plays
    • Ball Screen Sets
    • Horns Sets
    • Man to Man Post Up
    • Man to Man Isolations
    • Backdoor Plays
    • Man to Man 3 Point Shot Plays
    • 2-3 Zone Attack
    • Baseline Inbound Plays
    • Sideline Inbound Plays
    • Combination Defense Attack
  • Drills
    • Defensive Drills
    • Offensive Drills
    • Competitive Drills
    • Passing Drills
    • Rebounding Drills
    • Shooting and Scoring Drills
    • Toughness Drills
    • Transition & Conversion Drills
    • One on One Drills
  • Blueprint
  • Practice
  • Mental Toughness
  • Skill Development
  • Offense
  • Defense
  • Store

Offense

2-3 Zone Attack Concepts

By Brian Williams on January 2, 2018

Army Assistant Men’s Basketball Coach Zak Boisvert has put together some short clips with some concepts for attacking a 2-3 zone defense.

Coach Boisvert has posted several videos of some of the better schemes he has seen. His YouTube channel is: Zak Boisvert You Tube Channel

He also is also very active on Twitter: @ZakBoisvert

He has an outstanding resource site for coaches. You can access it here: PickandPop.net


The videos are YouTube videos, so please make sure that you are on a network that allows YouTube access.

Some school networks may block YouTube access.

Click the play arrow to watch the videos.

Please make sure that your sound is on as Coach Boisvert has narration to go along with the video clips.
Knife Drive to Attack a 2-3 Zone

Side Ball Screens to Attack a 2-3 Zone

Eight Principles for Sound Offense

By Brian Williams on September 14, 2017

By Alan Peel

Assistant Varsity/Junior Varsity Boys’ Basketball Coach, Bishop Miege High School

Owner/Operator, www.coachpeelbasketball.com

A major part of success in offensive basketball is having sound offensive principles that allow your team to maximize the efficiency of their possessions.  Legendary coach Dean Smith said, “The objective of any basketball offense is to score as often as possible on each possession.”

Much has been said about analytics and its use in basketball.  When analytics are applied to team play in basketball, especially offense, there are eight principles for sound offense that are proven to be effective.

In presenting these eight principles for sound offense, I will ask questions.  The reason being is to get you to think about your team’s own offense.  I have also provided some additional thoughts of my own to help you think about each question.

I should note that each of these eight principles for sound offense came from legendary coach Tex Winter, the inventor of the famed Triangle Offense.  While your team might not run the Triangle Offense, the principles are sound and can be applied to just about any offense.

  1. Penetration:  Does the offense penetrate the defense?

The most important thing that your offense can do is to attack the free throw lane.  It has been statistically proven that teams that have an offensive possession with the ball getting into the lane see increases in field goal percentage, trips to the free throw line, fewer turnovers, and better overall offensive efficiency.

Whether you are using the dribble or the pass to penetrate the lane, the ball should enter the paint at least once every offensive possession.  Defenses always collapse on lane penetration.  Teams that react slowly give up easy shots at the rim.  Defenses that react quickly to penetration are ripe for shots from behind the three-point line.

  1. Spacing:  Does your offense have good spacing?

A well-spaced offense has the ability to make quick passes from player to player while also being able to keep from being trapped by the defense.  A spaced-out defense becomes less effective than a defense that is able to stay close with help close to the ball.

If a pass has to be made with extra air under it, you are too far apart.  If two or more defensive players can easily guard one player, chances are you are too close together.

The ideal spacing for any offense is 15 to 18 feet.

  1. Offensive flow:  How seamlessly do you flow from defense to offense?

When your team’s defensive possession ends, how easily do you go from defense to offense?  Teams that utilize the fast break have the best opportunity to score more points, shoot a higher percentage, get to the free throw line more often, and are much more efficient than teams that don’t run.

An ideal offense flows from defense to offense instantly and is able to get up the floor quickly.  A team with a well-organized break is able to score quickly and get high-percentage shots.

  1. Ball and player movement:  Does the ball and do your players move with purpose?

The two worst kinds of movement are no movement and movement for the sake of movement.  The first one is obvious while the second one accomplishes nothing.

Players who don’t move are easier to guard.  A ball that does not move gives the defense a break and allows them to get properly set or stay set.

Players who move without purpose do nothing to help the offense score.  Passes, dribbles, and cuts merely for the sake of aimless movement accomplish nothing.

Teams that have players who move with a purpose create opportunities for themselves and their teammates to score.  Teams that are able to move the ball with the pass or dribble with a purpose are the ones that score more points and break down defenses more easily.

Effective passing is accomplished with good spacing and movement.  Teams that change sides of the floor at least twice in a possession have dramatically better offensive numbers than teams that don’t.  Teams that pass the ball into the post are better offensive teams than those that do not.

Dribbling is becoming a more-utilized offensive weapon thanks to the growing popularity of the dribble-drive motion offense.  However, players still tend to dribble in the same spot as soon as they catch the basketball.  This bad habit must be broken early in the season and ball toughness must be developed.

Generally speaking, the dribble should only be used under the following circumstances: to attack the basket, to improve a passing angle, or to avoid a closely-guarded five second count.  It should NEVER be used to dribble in the same spot repeatedly while waiting for pass or scoring options to develop.

  1. Multiple options:  Does any player with the ball have multiple options?

As someone who has a background in scouting, a player who has only one option on a play is part of an offense that can be easily scouted.  Players who are able to use more than one option make their offense more difficult to scout.

Every offense should have three main options for it to be effective: shot, post feed, ball reversal.

  1. Offensive rebounding and defensive balance:  Do you have the ability rebound AND get back on defense to stop transition baskets?

When the shot goes up, there should be players ready to rebound the basketball and players ready to get back on defense to stop a potential fast break.  Offensive rebounds provide an opportunity for greater scoring chances.  On second and third shots, scoring efficiency and shooting percentages improve.

Likewise, good transition defense takes away scoring chances from opponents.  Teams that are forced to play half-court offense are not as efficient in scoring as teams that have the opportunity to fast break.

To accomplish this, you need to determine which of your players should crash the offensive glass while also determining who needs to get back on defense to prevent a transition basket.  Against teams that like to run, you might find yourself sending two to the boards and dropping back three.  Against teams that are not inclined to run a fast break, sending three to the boards and dropping two might be more ideal.

  1. Versatility for players:  Does your offense give your players the opportunity to play more than one position?

In today’s era, positionless basketball is becoming more and more prevalent.  Teams are trying to find ways to position post players facing the basket out on the perimeter while also looking to post up guards.  This kind of versatility is something that puts defenses in a bind.

If an offense has players that can interchange positions, you have the ability to get a defensive mismatch.  Typically, guards do not guard players in the post while bigs do not tend to guard on the perimeter.  Offensive inversion of this kind creates headaches for players and opposing coaches alike.

  1. Talent utilization:  Does your offense utilize the talents of individual players?

Not every team has an offensive player the likes of Michael Jordan, Magic Johnson, Larry Bird, LeBron James, James Harden, Russell Westbrook, Kevin Durant, or Stephen Curry.  However, what if you had an outstanding player on your team?  How would you utilize this player?

The offense must fit your personnel and your personnel must fit your offense.  With individual players who have unique skill sets, you have to find a way to maximize their abilities within your offense or find an offense that works better for them.

Likewise, players who do not have the skill set or the talent to play in your offense must also have adjustments made for them.  They might not be the best scorers, rebounders, or passers, but they can find something to do that can help your team on offense.

To make this work best, start by figuring out what they do best first.  Once you establish that, get them to do that in your team’s offense before trying to find ways to expand their game to do more.

Conclusion

For those coaches who answer “yes” to all eight of these questions, you have something special with your offense.  If there is something missing, you might want to address it and see if you can add it into your offense without sacrificing the other eight principles for sound offense.

6 Zone Offense Actions

By Brian Williams on August 19, 2017

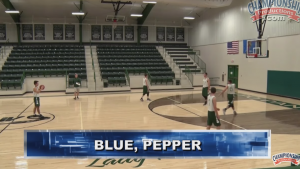
These 6 actions for attacking a zone defense are presented by Aaron Garrett, Head Coach at Amber-Pocasset (Oklahoma) High School.

There is sound with the video, so please make sure that your sound is on.

The video is hosted on YouTube, so you will need to be on a network that allows you to access that site.

The videos are from the Championship Productions You Tube Channel..

You don’t have to run the plays in their entirety.

You can take parts of them and incorporate into what you do. In my opinion, all ideas you get from others should be modified to your needs.

You might have to put in some work to get something out of this and watch the video several times to be able to imagine how the zone will shift to cover these movements.

Click the play arrow to play the video with his thoughts.

If you are interested in learning more about the Championship Productions Basketball Coaching Video (available in both DVD and Instant Video Format) that this drill came from, you can click the following link: The Break Point Offense: The All-Encompassing Offensive System

Capitalizing in Transition

By Brian Williams on July 31, 2017

The Coach in the video is PGC Basketball Director Tyler Coston.

You might not agree with his assessment, but at least I hope it helps you to define more clearly what you want your ball handlers to look for in transition.

There is sound with the video, so please make sure that your volume is on.

The video is a Vimeo video.

You will not be able to access the video to watch it if your server blocks Vimeo videos.

Click the play arrow to begin the video

The Two Most Valuable Offensive Breakdown Drills

By Brian Williams on July 18, 2017

Submitted by Coach John Kimble
CoachJohnKimble.com

Retired high school and college coach

Follow him on Twitter @CoachJohnKimble

Diagrams created with FastDraw

The “Pivot and Pass Offensive Drill” and the “55 Second Offensive Drill” are the two most valuable drills that any offense could have to improve players’ performances and techniques.  Besides the individual offensive techniques and skills that these drills teach and give players opportunities to improve on, the drills maximize time efficiency.  Each drill is multi-faceted, with several techniques being able to be worked on at the same time by different participating players.  The drills are game-realistic and competitive which brings out the best in players and also includes physical conditioning.  This saves valuable practice time, so that these and other drills can be used more often for coaches to teach,  coach, and correct players as well as for the players to learn and improve in the various skills that are needed for individual and team success.

The “Pivot and Pass Offensive Drill”

An invaluable offensive fundamental that is needed for a team to be successful in the execution of any offense is the crucial fundamental of all players being able to dribble against pressure, to pivot away from or around individual defensive pressure and then to be able to deliver the ball to an open teammate. This could be against man-to-man pressure, against half court zone or trap pressure or against full court defensive pressure. Teams must be able to move the ball both on the perimeter as well as to the inside to constantly attack defenders in the many various defenses that could be executed against them.

This drill should be utilized only after instilling the attitude to all players that the drill is a multi-purpose drill needed for each player to become a well-rounded and fundamentally sound basketball player.  It is not just a dribbling, pivoting and passing drill for 01. It is not just a defensive drill for X2.   It also is not just a drill for 03 to catch the ball and to then work on shooting techniques.  Instead, the “Pivot and Pass Offensive Drill” is an all encompassing offensive drill where all three players can work specifically on the offensive techniques that they individually need to improve on.  After three rotations of players, all three players in each group will have worked on the three segments of the drills–the fundamentals of the dribbler/passer, of the defender and of the pass receiver/shooter.  Because it is such a time-efficient and valuable drill and because it includes so many different fundamentals, this drill should be used more than once in every practice (for just short periods of time).

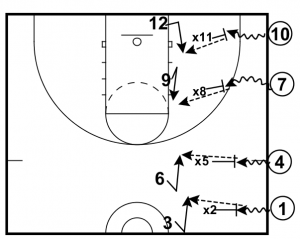
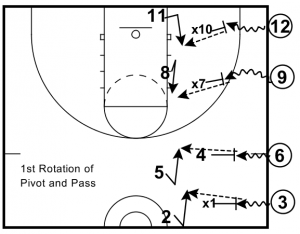
The dribblers/passers (01, 04, 07, and 010 in Diagram 1) work on the obvious dribbling, pivoting, and passing techniques and skills that are required for them to be solid offensive ball handlers. The first technique to be worked on is the actual dribble as the dribbler approaches the defender. Dribbling quickly (but in a very controlled manner) with the head up in a semi-crouch stance is the first point of emphasis for this offensive player. Protecting the ball with the non-dribbling hand and dribbling with either hand is one of the most important skills and techniques that each dribbler should also work on.  Another important skill for the ball handler is to work on the skill of passing the basketball with either hand. Still, another vital skill of the ball handler is being able to pivot with either foot as the pivot foot.

Working on defending a dribbling ballhandler and pressuring him when the dribble is killed is very necessary for a team to have pressure on the basketball during a game.  X2, X5, X8 and X11 are the first “on-the-ball defenders” in this drill.

Being able to catch the ball on the move, making a quick pivot and shooting quickly are necessary for an offensive basketball team to be able to score.  03, 06, 09 and 012 are the first cutters/shooters in this drill.  Notice that while 03 and 06 cut to their left to receive the passes, 09 and 012 cut from the left to their right.  These directions can be alternated periodically.  Diagram 1 illustrates the placement of an entire team so that each player in each three-man group can work on their specific techniques that are needed to be practiced.  See Diagram 1.

After a pre-designated time limit, all three offensive players rotate to their next position in the group.  An example of the first rotation of the drill would be to have 01 rotate to become the next defender while 02 now becomes the next designated pass receiver/shooter.  03 rotates from being the first receiver/shooter to becoming the next designated dribbler/passer, also placing 06, 09 and 012 as the other new dribblers/passers.  The newly designated defenders are X1, X4, X7 and X10.  The newest pass receivers/shooters will be 02, 05, 08 and 011 after the first rotation of offensive personnel.

After all three players in each of the four groups (for example, 01, 02 and 03 in the first group with 04, 05 and 06 in the second group) have rotated through all three of the positions: the dribbler/passer, the defender and the pass receiver/shooter; the drill starts over but with the pass receivers/shooters now breaking in the opposite direction that they originally started the drill.  In the first repetition of the drill, two of the designated groups have their shooters cut from the right to the left while the other two groups cut originally from the left side towards the right.  In the second repetition of the drill, all three players in each of the four separate groups will start in their initial positions.  But the actual shooters will break from the opposite directions that they originally started.  Therefore, this repetition of this drill will now have two shooters (03 and 06) break to their right, with the imaginary basket still being at the sideline behind the initial dribblers/passers.  That makes these shooters’ left shoulder, heel and foot the so-called “inside” shoulder and heel/foot.  The second two groups have the first designated shooters (09 and 012) cut towards their left.  This now makes their right side the “inside shoulder” and “inside heel and foot.”

A quota of a designated number of passes and shots in the set time limit can make the drill more accelerated and competitive.  There could be a contest between the defenders and the dribblers/passers of how many “successful” completed passes and deflected passes take place in the time limit.  “Winners” and “losers” could be defined with a small penalty given to the “losing player” after the conclusion of the drill.

Diagram 1

The designated pass receivers (03, 06, 09, 012 in Diagram 1) work first on the “pre-catch and pre-shooting stance.” The coaching staff constantly should be emphasizing to the (potential) shooter to “get your feet and hands ready!—to get behind the ball—give the passer a target!”  See Diagram 1.  In this scenario, the pass receivers/shooters (09 and 012) are breaking to their right and the imaginary basket is directly behind the passers at the sideline.  Even before the actual catch of the basketball, the pass receiver should try to already have his “inside shoulder” (shoulder closest to the basket, which is the left shoulder in this example) facing the basket and to have both his “guide hand” and “shooting hand” up (as if he is already shooting the ball). With the “shooting hand” in that position, it gives a good target to the passer. The pass-receiver should always pivot off of the heel of his “inside foot” (the foot closest to the basket, which is the left heel in this example). If the pass-receiver is in a stationary position, he can start with the “inside heel” already touching the floor and the remaining portion of that foot not yet touching the floor.  If the pass receiver is on the move, he might have to “chop up his steps” in order to time the “inside heel” hitting the floor (to pivot) just as the ball hits the palm of the “shooting hand.”  From there, the heel being planted first will stop the pass-receiver’s forward momentum of his cut toward the passer.  After the shot, the shooter should be able to rise straight up and come back straight down and not “float” in either direction. Stopping all of the momentum from the shooter’s cut before he shoots the ball will greatly improve shooting accuracy.  Each shooter (03, 06, 09, and 012) shoots as if the original passer (01, 04, 07, and 010) is the basket, so that the ball is returned for that passer to restart working on his skills and techniques.  See Diagram 1.

Once the momentum of the cutter is stopped, the inside heel actually will allow for a smooth, easy and complete pivot toward the basket, as the shooter swings his free (outside foot and leg) around so that he is completely “squared up” to the basket.  In this offensive drill, the pass/receiver/shooter “shoots” the ball  at an imaginary basket back to the original passer. The passer (01, 04, 07, and 010) is now quickly ready to resume working on his technique of passing to the shooter again, so the shooter can again quickly work on the “foot and handwork” part of his shooting technique (beginning with a new dribble and jump stop.

The men in the middle of the drill  (X2, X5, X8, and X11 in Diagram 1) utilize the drill as a defensive drill, who initially are guarding the dribblers/passers (01, 04, 07 and 010).   Effort and the emphasis on defensive fundamentals (such as proper stance and other various defensive techniques) should not be taken lightly by players or the coaching staff, as the drill is stressed to them as being a defensive fundamental drill.  These defensive players work on defensive techniques only on the original dribbler/passer and not on the pass receiver/shooter.

Diagram 2

The specific footwork and techniques of each passer/dribbler are demonstrated in the four steps are shown in Diagrams 2 through 5.

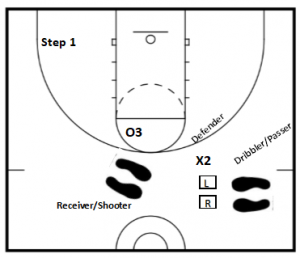
Step 1 of the “Pivot and Pass” Technique—As the dribbler approaches the defender and kills his dribble, the dribbler should take a small bunny hop and land simultaneously on both feet. This allows the “killed dribbler” to use either foot as the pivot foot. See Diagram  2.

Diagram 3

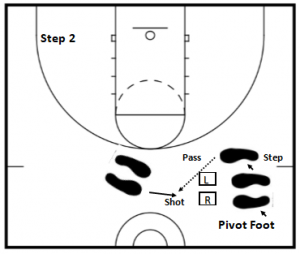
Step 2 of the “Pivot and Pass” Technique —If the passer wants to attack the defender by passing laterally around the defender’s left side, the dribbler should land and make the right foot (the foot directly facing the defender’s left foot) the free foot and therefore make his left foot the actual pivot foot. This makes the passer’s right foot the foot that can laterally step toward the outside of the defender’s left foot. As this is taking place, the passer should protect the ball by firmly holding the ball with both hands with the ball held behind the knee of the free knee (the right knee in this example). If the passer’s free foot is laterally outside the defender’s foot, the passer then could “fake low and go high” or “fake high and go low” (passing high over the defender’s left hand or passing low under the defender’s hand). Constantly tell the dribbler-turned-passer to “protect the ball behind the knee” and to “step due east or due west.” This means that the dribbler/passer should constantly attack the flanks of the defender by stepping laterally around the defender and not toward the defender. See Diagram 3.

Diagram 4

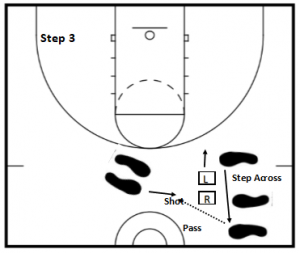
Step 3 of the “Pivot and Pass” Technique —If the on-the-ball defender counters the dribbler’s first lateral attack, the dribbler should “rip the ball low and hard across his shoe tops” as he steps with a front pivot across the face of the defender to laterally attack the defender on the opposite side (in this scenario, it is the defender’s right side). The ball ends up on the inside of the passer’s knee of the free leg (the right knee in the diagrams). If the passer’s free foot (right) gets outside defender’s (right) foot, the passer looks to pass the ball around the defender (“fake high and go low” or “fake low and go high”) on the opposite side from the initial side of attack. Again, coaches should strongly emphasize to the pivoting passer to protect the ball behind the “free knee” (right) and again step “due west and/or due east” in the lateral attacks on the ball defender.  See Diagram 4.

Diagram 5

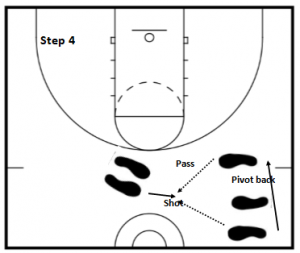
Step 4 of the “Pivot and Pass” Technique —If the ball defender reacts quickly and takes this second technique away, coaches should emphasize to the offensive player to remain in the semi-crouch stance, to then quickly reverse-pivot off of the same (left) pivot foot and to then attack the ball defender’s original (left) lateral side. The ball should now be back behind the outside of the knee of the free (right) foot.

Again, the main three points of emphasis to the passer are:

  • Protect the basketball by placing the ball behind the “free” knee,
  • Step outside the defender’s foot (by going east or west),
  • “Fake high and go low” or “Fake low and go high.” If the defense counters this step, the dribbler should reverse pivot and look to make a lesser contested pass to a another teammate or attempt to use all three techniques again. See Diagram 5
Diagram 6

After the 55 seconds expires, the dribbling/pivoting/passing player (01) switches to the defensive station, while the first defender (X2) switches to work at the pass-receiving station/shooting station, and the first pass-receiver/shooter (03) rotates to the dribbling/pivoting/passing station. This rotation should take less than 5 seconds and the drill starts again. 55 seconds later comes the next rotation of the three players.  After the third 55 second time frame has concluded, coaches can start the second round with all offensive dribblers using a different dribbling hand and making the right foot as the new pivot foot. Three minutes will allow for all three players to rotate through each position again.  In just six minutes, three players have each had almost two minutes of concentrated work on all three stations—the dribbling, pivoting, and passing phase, the defensive phase, and also the pass-catching and shooting phase.  See Diagram 6.

The “55 Second Offensive Drill”

Every offensive/shooting and shooting drill has definite characteristics, but all drills must be “game-realistic.”  To make these drills as “game-realistic” as possible,  coaches should incorporate as many types of pressures (on the players) as possible. They should try to incorporate “success” and  “competition” pressures–trying to beat other players, other squads, or other types of opposition.  The other types of opposition could be pre-set standards and can be time on the clock.   Obviously, accuracy should be stressed in all shooting drills, but also “quantity” should be emphasized.   All shooters, passers, and rebounders should always go at “game speed” in practice because they will be going at that speed in the games.   Coaches should continually accelerate rebounders, passers, and shooters in each and every shooting drill.  They should have pre-set “quantity AND  quality” standards  set for  each  shooting drill used.  That increases the game realism, because each individual is trying to succeed not only for himself, but for his team (or group or squad).  Every shooting drill has a pre-set standard of a specific number of attempts the shooter must take as well as a standard of how many shots he should make. Again, this forces the tempo and intensity level up for each shooting drill used.  Game realism also means rewards for the winners and penalties for not winning.  None of the penalties are harsh or hard, but they are a true penalty. They could be some type of a running penalty, some pushups, or sit-ups. Competing against the clock is always beneficial, because everyone has a common opponent and measuring stick.

Using the scoreboard clock not only gives every player a common opponent, but a clear, visible and constant opponent.  Using time limits always speeds up the shooting groups–it does not allow a shooter to take too much time in shooting.   The phrase “Be quick, but don’t be in a hurry” is a great phrase that should be used often in this drill and in games.   When in a game does a shooter, a passer, or any player have the luxury to take his time and to go at a “comfort speed?”  By continually accelerating players in all drills (not just shooting), coaches get players used to having a much-quicker “comfort speed.”

Every drill must also be as time-efficient as possible, because no practice time can afford to be wasted. This can be accomplished by incorporating other offensive techniques and fundamentals into each shooting drill, such as passing, rebounding, cutting, coming off of screens, catching, pivoting, as well as the shooting.  Coaching staffs should incorporate the spots where the player will most likely get those shots in games, as well as the types of passes used in games. Also coaches should place the passers where they will pass the ball in game situations.   Shooters should start in their initial locations and the shooters are required to cut and break to the spots where they most likely will take the shots in games. Passers are required to use the same type of passes they will use in a game, always at game speed.   Passers are forced to quickly AND accurately make the appropriate passes that they will make in a game. Sometimes have managers or coaches can have their hands up in front of the shooters to act as dummy defenders. Rebounders are encouraged to aggressively offensively rebound the basketball before making quick and accurate outlet passes as they would in a real game. If the coach constantly emphasizes the speed and intensity needed, other drills that follow in that day’s practice will naturally pick up the same speed and intensity levels that are required for those drills to be successful.  Another by-product from these shooting drills can be conditioning. If everyone works at meeting the “quantity and quality” standards that have been set, every player’s physical conditioning will also improve.

Diagram 7

In the many different types of shooting drills that incorporate the “55 Second Offensive/Shooting Drill” theme, there are three players involved.   See Diagram 7.

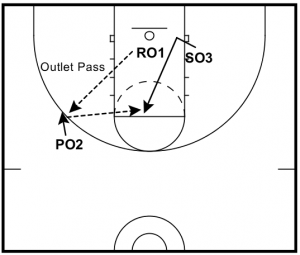
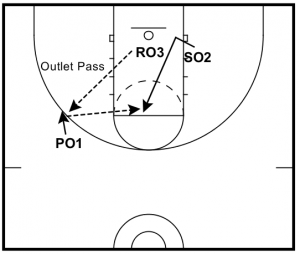
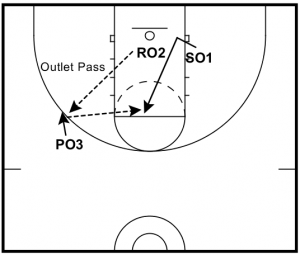
One player is the designated “Passer” (02), one the designated “Shooter” (03), and one is the “Rebounder” (01).  After 55 seconds, all three players rotate over one designation and the drill is executed again.

The “Passer” rotates to the “Shooter,” the “Shooter” rotates to the “Rebounder” station and the “Rebounder” rotates to become the next “Passer.”  See Diagram 8.  55 seconds later, the three players then rotate for the last time (on that side of the court.)  See Diagram  9.

Diagram 8
Diagram 9


There should not be more than 5 seconds for the transition and the player rotation. In three short minutes, each player receives almost one minute of concentrated work on offensive skills of passing, catching and shooting, and rebounding and outlet passing. The best rotation is from “Passer” to “Shooter” to “Rebounder” and on to a different shooting location, where the three-man rotation starts again. It is important to notice that this drill is not only called the “55 Second Offensive/Shooting Drill to demonstrate the drill lasts 55 seconds (before there is a rotation), but to also emphasize that the drill is not just a shooting drill, but a rebounding and outlet passing drill, a cutting and pass receiving drill, and a passing drill.  Otherwise this would mean that the remaining two players in the drill other than the shooter are not as important and do not need to work as hard at the various fundamentals they need to be working on.  On the contrary, the two players that are not shooting in this drill are equally important and should work just as hard as the shooter in the drill.

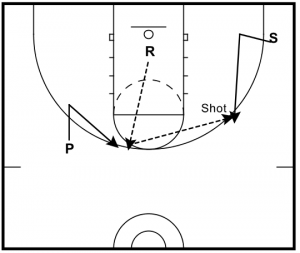
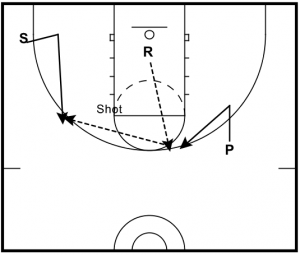
Diagrams 10 and 11 are illustrations of the shooter shooting from the wing areas on the offense’s right and left side of the court, with the passer making the pass from the top of the key.  Other examples could be of the shooter shooting from the deep corner after receiving the pass from various spots where he could receive the ball from in games.  Those spots could be from the weakside wing area on a “skip pass,” from the ballside wing area on a “down pass,” or possibly from the ballside low post area on a “kick-out pass.”

Diagram 10
Diagram 11


The locations of the designated “Shooters” and the placement of the designated “Passers” can vary to fit the specific offense’s needs, while the “Rebounders” obviously always remain near the basket to grab the rebound, outside pivot (away from the imaginary defense or against a manager), and make the outlet pass to the “Passer.” See Diagrams 12 thru 16 for just some of the possible combinations of passing and shooting locations the drill could utilize on just one side of the court (even though the drills could and should be utilized on both sides of the court).  These passing and shooting spots should be determined by the coaching staff analyzing the particular offense(s) used and where passes and shots are generated from those offenses.

Diagram 12
Diagram 13
Diagram 14
Diagram 15
Diagram 16


The “Pivot and Pass Offensive Drill” and the “55 Second Offensive Drill” are the two most valuable drills a coaching staff could use because they allow coaches an excellent opportunity to not only teach the techniques the proper way, but they give each player game realistic opportunities to learn the skills, to practice the skills and to improve those necessary skills.  Each drill is multi-faceted, with several techniques being able to be worked on at the same time by different participating players.  The drills are game-realistic and competitive which brings out the best in players and can then include physical conditioning. This saves valuable time in the practices, so that these and other drills can be used more often for coaches to teach and coach players as well as for the players to learn and improve in the various skills that are needed for individual and team success.

About the Author

Coach Kimble held the Head Basketball Coaching position at Deland-Weldon (IL) High School for five years (91-43) that included 2 Regional Championships, 2 Regional Runner-Ups and 1 Sectional Tournament Runner-up. He then moved to Dunlap (IL) High School (90-45) with 2 Regional Runners-up, 1 Regional, 1 Sectional and 1 Super-Sectional Championship and a final 2nd Place Finish in the Illinois Class A State Tournament. He was an Assistant Basketball Coach at Central Florida Community College in Ocala, FL for 1 year before becoming Offensive Coordinator and then Associate Head Coach for 3 additional years He then was the Head Basketball Coach at Crestview (FL) High School for 10 years, averaging over 16 wins per season.

He has had articles published in the following publications such as: The Basketball Bulletin of the National Association of Basketball Coaches, the Scholastic Coach and Athletic Journal, Winning Hoops, Basketball Sense, and American Basketball Quarterly. He has also written and has had five books published along with over 25 different DVDs by Coaches Choice and Fever River Sports Production.

See him on Twitter @CoachJohnKimble and his Web Page “www.CoachJohnKimble.com”

6 Point Checklist for Offensive Structure

By Brian Williams on July 6, 2017

This pst was written by Peter Lonergan, Manager Basketball Development and Communications, Northern Suburbs Basketball Association–Australia.

When deciding on which offensive structure or system to implement with a team, it is important to understand what components make for a successful offense. The “six point checklist for offensive structure” can assist in simplifying the choice of structure and ensures that the coach does not waste time implementing and teaching an offensive system that does not provide consistent scoring opportunities.

Perhaps the most important aspect before even selecting your offensive structure or putting it to the “six point test” is that it suits your playing personnel and is something your players have the ability and skills to operate.

Any offensive system will only be as good as the fundamental base of the players and the bulk of practice and preparation time should be devoted to individual skill development.

The next step is to put your offensive structure or system to the “six point checklist”.

DOES YOUR OFFENSIVE SET OR STRUCTURE HAVE:

· Opportunities in transition (early offense)
· Spacing
· In-built ball reversal
· Opportunity for dribble penetration
· Opportunity for post play
· Opportunity for shooters

To effectively challenge the defense and provide high quality scoring opportunities, it is important an offensive structure or system has most, if not all, of the above qualities.

1. OPPORTUNITIES IN TRANSITION (Early Offense)

Any offensive system needs to be able to provide scoring opportunities early in the possession, either after a defensive stop or a made basket. Basic full court organization, perhaps with an inbuilt counter for extended pressure and clear roles for all players in transition, are valuable in creating quality shots early in the possession and possibly “easy” baskets. The transition or early offensive system needs to flow quickly and smoothly into the half court set to ensure shot clock pressure is not created as the offense “burns” clock in getting organized.

2. SPACING

This is perhaps the most important aspect of any offense. Without it, the ability of individuals to execute one on one skills and key elements such as post play and penetration are limited. Whatever the system being used, all players need to have an understanding of spacing and just as importantly, how to identify and react accordingly when spacing is poor.

3. IN-BUILT BALL REVERSAL

As with spacing, the ability to shift the defense through ball reversal is essential to effective team offense. Most effective offensive systems have “in-built” ball reversal, that is, they explore one side of the floor, then create action away from the ball and a conduit to take the ball to that action on the opposite side of the floor. This can be achieved through stepping interior players to the perimeter to reverse the ball, or reversing through the post.

4. OPPORTUNITY FOR DRIBBLE PENETRATION

Ask coaches what is the toughest thing to defend in the half court. Many will reply containing the ball and handling dribble penetration. Penetration of the ball into the key is a vital element of team offense and places pressure on the defense in terms of stopping the ball and then reacting to players in receiver spots. The “drive and kick game” has become more and more prevalent with the change to the FIBA shot clock and most players have the ability to break down an opponent off the dribble. It is essential for an offensive system to provide “penetration lanes” and create action that leads to close-outs and opportunities to “put pressure on the rim” through dribble penetration.

5. OPPORTUNITY FOR POST PLAY

The focus of any offensive system is to create quality, high percentage scoring opportunities and this is often done through the post or creating shots in the lane. The lane and post area can be described as the “80 per cent land of opportunity” so common sense would suggest it a sound idea to create action that provides scoring opportunities in this area of the floor.

6. OPPORTUNITY FOR SHOOTERS

When all is said and done, the name of the game is scoring and putting the ball in the hoop. This can be done in a variety of ways, but good teams combine a combination of early offense, with post play, shots in the lane and perimeter shooting. To ensure a team is both hard to guard and scout, creating opportunities for shooters is important in providing offensive balance and making for a balanced attack.

If an offensive set or system has all the above ingredients and players have a fundamental base, there is a strong chance it will provide plenty of quality scoring opportunities.

This checklist can also be used as a reference point during games. Often the offense may struggle because one of the above six points is not in place.

There are rarely magic solutions to team offense or coaching in general, but the application of this checklist and reference to it during the course of practice and games is one way to ensure your team is a tough proposition for any defense.

  • « Go to Previous Page
  • Page 1
  • Interim pages omitted …
  • Page 5
  • Page 6
  • Page 7
  • Page 8
  • Page 9
  • Interim pages omitted …
  • Page 13
  • Go to Next Page »

Primary Sidebar

  • Twitter
  • Facebook
  • Linkedin
coachestoolbox
personaldevelopmenttoolbox
basketballplayerstoolbox
basketballtrainer
athleticperformancetoolbox
coachingbasketball

© Copyright 2026 Coaching Toolbox

Privacy Policy