• Skip to primary navigation
  • Skip to main content
  • Skip to primary sidebar

  • Basketball Plays
    • Ball Screen Sets
    • Horns Sets
    • Man to Man Post Up
    • Man to Man Isolations
    • Backdoor Plays
    • Man to Man 3 Point Shot Plays
    • 2-3 Zone Attack
    • Baseline Inbound Plays
    • Sideline Inbound Plays
    • Combination Defense Attack
  • Drills
    • Defensive Drills
    • Offensive Drills
    • Competitive Drills
    • Passing Drills
    • Rebounding Drills
    • Shooting and Scoring Drills
    • Toughness Drills
    • Transition & Conversion Drills
    • One on One Drills
  • Blueprint
  • Practice
  • Mental Toughness
  • Skill Development
  • Offense
  • Defense
  • Store

Defense

Tilt Pick and Roll Defense

By Brian Williams on September 26, 2017

This ideas was contributed by Randy Sherman to the FastModel Sports Basketball Plays and Drills Library.

Coach Sherman s the owner and founder of Radius Athletics – a basketball coaching consulting firm – where he consults with basketball coaches at all levels on coaching philosophy, practice planning, Xs & Os and teaching a conceptual style of basketball.

You can also find out more about FastModel Play Diagramming software by clicking this link: FastDraw

This post is to provide an idea to consider using in certain situations and against certain players as a part of the way you cover on ball screens. It is not meant to say that this is the only way you should defend ball screens or that it is right for every team at every level. As a coach, you have to make a decision as to whether or not it applies to your situation.

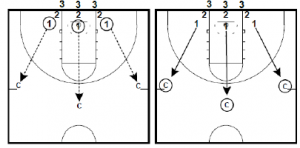
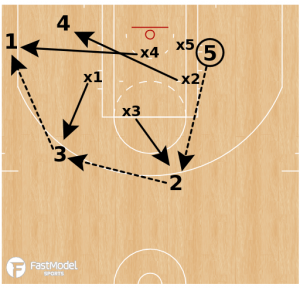
“Tilting” the offense to the left side of the floor and forcing players to use non-dominant hand in ball screens….


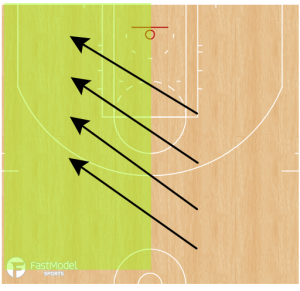
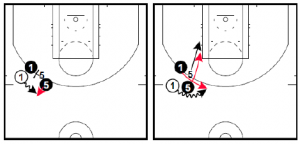
“TILT” – The purpose is to TILT the offense to left side of the floor and force ball handlers to use their left hand (assuming it is their weak hand)


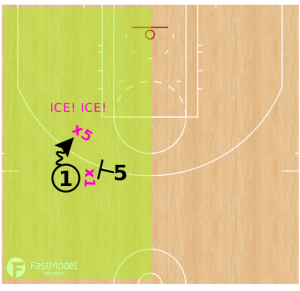
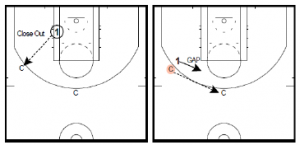
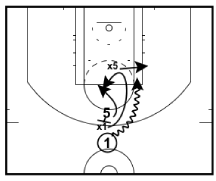
Therefore, on any ball screen on the left side of the court we ICE the ball screen. Forcing them away from the screen makes the ball handler use left (weaker) hand.

X5 must alert the on-ball defender… “ICE! ICE!”

X1 adjusts to force the ball handler away from the screen

X5 gets in line between ball and rim to contain dribbler

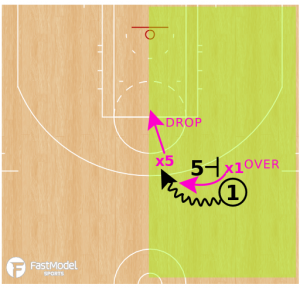
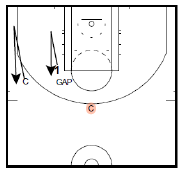
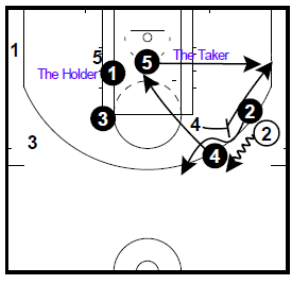
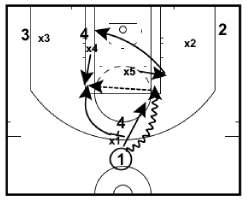
On right side of the floor, we use OVER + DROP

X1 goes over the screen.

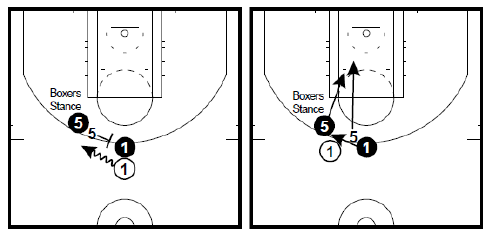
X5 provides a flat hedge and gives ground (drops) as dribble attacks. Keep an eye on the second hand of the dribbler touching the ball. That’s when you must contest the pull up.

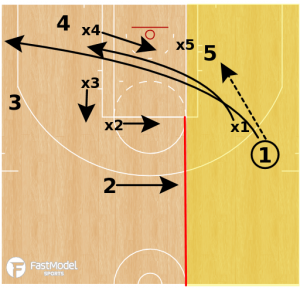
Ball handler is attacking with left (weaker) hand and giving cushion baits him/her into the midrange two off the dribble.


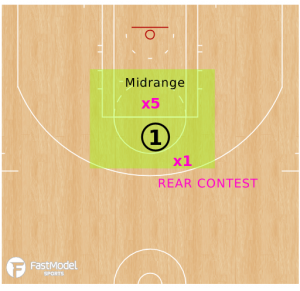
By dropping, we’ve induced Player 1 into the midrange pull up.

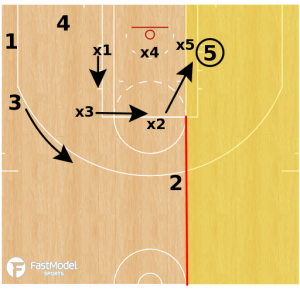
X1 makes a “rear contest” and attempts to swipe at, block or change the shot from behind


Sean Miller Defensive Notes

By Brian Williams on September 12, 2017

This post came from Army Men’s Assistant Zak Boisvert’s PickandPop.net site.

The site has a lot of quality coaching ideas and information.  Definitely worth a look!

Sean Miller – University of Arizona (Nike Clinic, Phoenix, Arizona).  Sent to Zak by Ash Arnott

DEFENSIVE PHILOSOPHIES
o Times are always changing.
o IMPORTANT when developing your defensive philosophies: “How you teach it, how you build it”.
o Question to ask yourself: Are you playing the way you have “built it”.
o The way we track success at University of Arizona is:
• Points per possession;
• FG% Defense;
• 3FG% Defense (Good teams are vulnerable) & attempts;
• Defensive Rebound %;
• Fouls – We don’t want to foul.
o 80-20 Rule – We use the same defensive principles 80% of the time, we leave 20% for adjustments.
o For Example: We don’t switch ball screens, we may need to make the adjustment during the game and start switching ball screens.
o DO WHAT WE DO!

CLOSE OUTS
Start every practice with close outs:
o Big step, we want to cover ground – Chop your feet, while chopping feet your butt goes down and your hands go up.
o Hands ! Elbows bent (makes it easier to get hands to passes, dribble and shot).
o One hand challenges shot.
o The distance the defender should be from the shooter = Reach out & touch him.
The defenders hand should not go past his opponent’s body; this is how defense fouls (too close to offensive player). Every player will have different distances due to his or her arm length.
o If CONTACT is made = Hands UP & OUT

ON FAKES:
o Back foot leads the way – JUMP BACK.
o Fake = Chop back, when ball is brought back to shooting position = Chop forward. Arms
are active at all times.
o We don’t get beat to the outside of our defense (baseline drive in this case)
= CARDINAL SIN.

Diagrams created with FastDraw

DRILL
Vegas Closeouts
• Lines start on the baseline. (Can have managers, coaches, other players at three spots around the three point line)
• First in line step out – Pass to the coach.
• Close out – Using our closeout rules.

Progression:
• Bring it back to one line.
• Have player on wing – Coach at the point.
• Defender works from “GAP” position to Closeout.

Progression:
• Can have Wing player cut up and down the sideline – Making the defender have to move.
• Defender needs to continue to see MAN & BALL, and adjust his/her defense when the ball is in the air.

BALLSCREENS
o We believe in keeping it simple with the way we defend our ballscreens.
o It can become confusing for a player trying to remember how to defend ball screens. An athlete can get lost trying to remember how to defend middle, wing, step up screens and remembering what defense is needed with each player; over, under, double or switch.
o We DO NOT go UNDER the ball screen unless it’s a STEP UP SCREEN. (Remember good teams are vulnerable to good teams shooting high 3FG %).
o THE FUNNEL.
If a screen is inside the funnel – Go back to your own man.

Keys
1. We want to be tough on the ball. Most important when defending the ballscreen.
2. We don’t need to bully through the ballscreen – It never ends well (FOULS). Don’t get hit & chase the ball handler.
3. Screener Defender – LOUD, EARLY & CONTINOUS.
The athlete needs to call the screen loudly, needs to be called early, and needs to continuously communicate that the screen is coming.
4. All 5 guys on the court help defend the ballscreen ! You see a ballscreen, sprint to it.

“JUMP”
o Vs. Pick & Pop
o We jump side ballscreens or a middle screen by a shooter.
o It allows us get back to a shooter quicker.

SCREENER’S DEFENDER

o Is loud, early & continuous. Call “JUMP, JUMP, JUMP”
o Match screener’s feet (VERY IMPORTANT).
The wrong angle of defenders feet can result in offensive player splitting the screen, or penetrating right past defender to the basket.
o “JUMP” = Take a big step out (Remember we are matching the screener’s feet) and then slide with high hands (No direct penetrations to the basket).
o Mindset – I am not fouling.

ON BALL DEFENDER:
o Tough on the ball
o No baseline drives.
o Go over the screen and under your teammate. (Very important)

IF SCREENER IS A SHOOTER:
o “X” Action.
o When guarding a ball screen the low man (in this case the 5) and the screener’s defender (in this case the 4) switch the men they are guarding. The bottom defender must be verbal and tell the man guarding the ballscreen where to go.
o The player X-ing out is the “The Taker”.
o The GUARD helping the posts by staying in front
of the opposite post is “The Holder”.
o The Screeners defender needs to sprint back as quickly as possible and defend the post (Defend the post by your ‘rules – ¾ front, full front etc.).

“PLUG”
o Vs. Roller
o We plug screens that are set in the middle of the floor
Ash Arnott
o It allows the defender to get back to the roller quicker.
SCREENER’S DEFENDER
o The defender who “PLUGS” is in a boxer’s stance – Outside foot and hand up – Active.
o Doesn’t let the roller get below him. (Kaleb Tarczewski did a great job for us).
o Match the screener’s feet.
o Stop the ball – Your job is to contain and wait till the guard can get back to man, then you worry about your man.

You can read the rest of the post and download the notes and diagrams at this link: Sean Miller Arizona Defense

Veer Back Pick and Roll Defense

By Brian Williams on April 23, 2017

This post was originally from Zak Boisvert on his basketball Coaching Website: Pick and Pop

His YouTube channel has several videos with various types of man-to-man plays, zone sets, and inbounds plays. You can subscribe to receive an update when he posts a new video Zak Boisvert You Tube Channel

You can follow him on Twitter at this link: @ZakBoisvert

This is how Coach Boisvert described the video:

Embedded below is a video I put together exploring the NBA defensive concept of “Veer-Backs.” Through the first 5 days of the playoffs, you’re seeing a ton of these teams executing veer-backs on a lot of middle pick & rolls.

Make sure that your sound is on and that you are connected to a server that gives you access to YouTube Videos.

The first few clips are using a Veer back

I have also posted some notes below the video from as well as some links to other resources from Pikandpop.net from NBA coaches on defending pick and roll.

The video includes clips of Veer Back vs. 1) Snake on a Middle Pick and Roll, 2) Pick and Pop 3) Side Pick and Roll 4) Icing a Side Pick and Roll and finishes with a triple switch.

Ron Adams, Golden State Warriors Defensive Guru, FIBA Basketball Coaches Clinic

Diagrams created with FastDraw

-As soon as the guard hears the “Flat” call by his teammate, he presses into the ball-handler and directs him towards the screen and then he chases the ball over the top of the screen.

-In “Flat,” the screener’s defender slides with the ball. The worse the screener is as a shooter, the deeper the big defender gets on this “Flat” coverage. The shooting ability of the screener dictates the depth of our “Flat” more than the shooting ability of the ball-handler (although against a great shooting point guard, we won’t utilize “Flat” much).

-Veerback: If the ball-handler gets too deep and attacks the big, the guard calls “Veerback” to tell the big (x5) that there’s a switch. X5 will keep 1 in front while x1 veers back and drives his butt into 5 on his roll.

-Big-to-big communication is so vital. They’re playing defense together.

Click for Complete Ron Adams Clinic Notes

Click for Complete Brad Stevens Clinic Notes

Doubling The Low Post and Rotating

By Brian Williams on April 4, 2017

This conversion defense drill was contributed by Mo Dahkil, former video coordinator for the Clippers and Spurs to the FastModel Sports Basketball Plays and Drills Library.

You can also find out more about FastModel Play Diagramming software by clicking this link: FastDraw

These were Coach Dakhil’s comments about the post:

Rotations are extremely difficult to nail down and teams must drill constantly to make sure there is an understanding of who is rotating. The other factor that makes these rotations work is constant communication. The best defenses are constantly talking and communicating with each other. Another note when practicing the rotations, it is important to have all players practice every position in the rotation. It helps them learn what their teammates are doing but situations may occur where they will be in position.

Editors Note from Brian: A point of emphasis on helping or trapping and then rotating from Kevin Eastman is that you want your defense to rotate and not scramble. Rotation implies having an organized system. Scrambling implies disorganized chaos.

With more emphasis being put on “one more pass” from an offensive standpoint, it is even more important that defensive rotations be organized and practiced.

Not to say that this is the exact system you should use, but my hope is that it will give you some ideas to apply if you do double the post and rotate out.

1 enters the ball into the post and then cuts to the WS corner.

X4 can tag the 1 as they cut but should remain at the low HL position.

X1 will go with the 1 and stop at the WS key.

As the 2 will slide over, X2 will become the one responsible for doubling the post.


When X2 goes to double, this forces a few rotations.

X3 will move to the high HL position and is responsible for any pass to the 2.

The X1 will slide and maintain an equal distance between the 3 and 1; they are responsible for any pass out that way.

X4 will remain in the low HL spot.


The defense is willing to concede the pass to the 2 because it is the easiest to recover to.

The second rule defines who is rotating where.

In the previous example X1 rotated to the 1 because he was in between the SS elbow and the sideline.

If the 2 passes the SS elbow then the first example of rotations is intact and X2 will rotate to his man.


The ball is kicked out to the 2, and as the offense swings the ball, X3 takes the 2, X1 takes the 3, and X2 leaves the double team and sprints to the 1 in the corner.

Whoever doubles the post will have the longest distance to cover but should be able to get there as the ball is swung.

An adjustment can be made, and teams could have X4 take the corner and X2 rotates to the 4 if the team is comfortable with the match up.

Jim Boone Defensive Teachings

By Brian Williams on March 9, 2017

These notes came from Bob Starkey’s (Longtime D1 Assistant Coach–currently at Texas A & M) Basketball Coaching Blog, hoopthoughts.blogspot.com.

Jim Boone of Delta State is one of the nation’s foremose teachers of the Pack Line Defense. Below is a list of key teaching points in Jim’s system. At the end of this story is the entire link the comes from his website: http://www.coachjimboone.com

Conversion Defense
• There are two critical areas in regards to being an effective defensive team that you as the coach must be accountable. The first is conversion defense and the second is defending the low-post.

• In our Conversion Defense we are not assigned a specific player necessarily, but rather, we are defending positions on the floor in order to stop the ball and our opponents transition offense.

• Our conversion defense begins as the ball is being shot by our offense. We send two guards back on defense as the shot goes up – we feel that the benefit of having our guards back on defense to STOP the BALL, is of a far greater benefit than any advantage that may be derived by having one or both rebound the offensive glass.

We designate which guard is our “Lane Defender” and which guard is the “Ball Defender”. The lane defender sprints to paint, finds the ball and takes the lane-line on the side that the ball is being entered into play. He positions here in order to take away any cuts into the lane and will closeout to a “Gap Position” or to the ball, as soon as the lane is secured. The ball defender works to contain the ball-handler at half-court, and preferably get the ball out of the middle of the floor. Again, he must contain the ball first and foremost, and of course, his point of pick-up can change due to our opponent’s personnel.

• The remaining three players sprint back to paint as soon as our opponent gains possession of the ball. We teach their first three sprint steps to be with total disregard to vision; turn and sprint three steps, and then locate the ball as they continue to the lane. We will position toward the ball-side as deep as the ball. We cannot express enough the emphasis that we place upon our team of not giving-up transition baskets, NO LAY-UPS!

Pressure on the Ball
• We must place pressure upon the basketball, we cannot allow the ball handler to play comfortably, to easily look over the court. Offenses today will pick your defense apart if you allow them to do what they want to do with the ball. This is a great myth in the Pack Line Pressure Defense, that we do not pressure the ball – that we are all about containment. Yes, we must contain and our players must know their limitations, but we must pressure the ball.

It is much like the football quarterback; the passer that has all the time needed to drop back and throw the ball, any NFL quarterback will pick apart a defense that does not pressure – the same holds true with our game. With this being said, we cannot allow the ball to get into the PACK AREA. Our point of pick-up is at half court, in the play area it is determined by whom you are guarding – your game and his game.

As much as we want and demand pressure on the ball, we must also understand a very important axiom I our defensive game planning; “Sometimes to not guard, is to guard”. In other words, there are players that you are better served to not defend, and therefore, utilize this defender as a helper.
• We do not force the ball in a specific direction. We simply tell our players, “DO NOT GIVE-UP THE BASELINE”. We do not want them to feel that it is OK to force the ball to the middle, we just cannot get beat baseline. We will emphasize that our players must have their baseline foot positioned outside of the offensive player’s baseline foot.

• We will drill a lot of one-on-one in order for our players to learn their limitations, to understand how to keep the ball out of the PACK, and to learn how to force contested jump shots.

• We deny inside the arc and we will work on this more from a whole method standpoint more so than a 1on1 breakdown drill, but we absolutely do not want to allow the ball inside the PACK AREA (17 foot mark).

• Footwork is of paramount importance in our pressuring the ball, we want to Step (point our toe) in the direction that the ball is being dribbled, and Push with our opposite foot. We use the term, “Guarding a Yard” with our players, if we can execute two quick slides, we can arc and defend the ball. Use quick, short, steps without bringing our feet any closer than 12 inches, there is an imaginary ruler between our heels, no Heel Clicking.

• If we can force a Dribble-Used situation, we now leave the PACK area with all of our defenders, in an effort to all-out deny all four offensive players. This is a great opportunity for us to create a panicked, and hopefully a turnover situation for the offense. The player defending the ball must verbalize the dribble used situation by calling out “FIVE – FIVE – FIVE”.

Jumping to the Ball
• We do not jump to the ball per say, our first move is to jump back into the PACK AREA and then move toward the ball to preserve our Ball-You-Man relationship. Therefore, the nature of this position places our defender closer to the ball than the man who passed it.

• We assume a flat triangle position, slightly open and inside the PACK AREA when our man does not have the ball and is one pass away.

Closeouts
• Closing out to the ball is the key to our recovery mode, sprint the first two to three steps, with the last couple being short, choppy, steps. We must accomplish two objectives in our closeout; first we must closeout “Hard & Short” with our weight back prepared to absorb the dribble (we will not get blown away by the dribble), and secondly, we must have High Hands. We teach our players to keep their hands high, with elbows bent, for a 1001 count. We must create the illusion that there is no shot to be had. We cannot allow the offense to have rhythm jump shots.

Gap Defense
• All Non-Ball Defenders are located inside the Pack Line – This is the most critical part of our defense. We do not believe that our defenders can accomplish three things: they cannot Deny, Help, and Recover. Therefore, we have eliminated the denial, and we now focus entirely on the other two factors – Help and Recovery. Because our defenders in the Gap are already positioned in Help, they are now quicker in their recovery to the ball – there is no negative movement, away from their recovery.

• We are constantly “Re-positioning” in the Pack area:

1) Position Up the Line, but Off the Line – slightly closed to the Ball

2) Vision is of the utmost, we must see both Man and Ball

3) Do not Help to Take a Charge, but rather with our Near Arm and Leg, we do not want to become Blind to our Help, by losing sight of our man

4) Bluff help as much as possible, we cannot become sterile in our positioning.

5) We must be Active & Energized in our Gap – We are Zoning the Ball

Flash Post
• We are positioned in a flat triangle with our closest foot to the ball slightly forward, therefore we are in a denial position to begin and better equipped to take away the flash.

• VISION is key, WE MUST SEE BOTH MAN and BALL!

• Upon the offensive players flash cut, we intercept it with our forearm. We teach our defender to use his forearm, to bump or force the offense away from the lane without extending the forearm, which would be a foul, in order to deny.

It is a reality that our defender will momentarily lose sight of the ball, this occurs whenever we are defending a cutter, weather a screen is involved or not.

Defending the Low Post
• You must have a very clear and concise philosophy of defending the low post. How you defend this area dictates everything else you do defensively.

• There are only two areas to be defended; the low post and the perimeter. Everything that occurs in our Post Box (Approximately two steps off the lane and below the first hash mark on the lane) is considered the low post, everything else is the perimeter.

• We ¾ Deny on the High Side of the Post, we tell our players to “Smother” the Low Post. Activity is our biggest key, WE MUST BE ACTIVE!

• We can play ¾ high because we allow no baseline penetration. This also places us in a better position to take away the “High-Low” entry into the low post.

• We must know our slip-point in the low post; it can vary from player to player, depending upon size, length, and quickness. Anytime the ball is on the side and the offense tries to move us up the lane, upon approaching the mid-lane area we must slip behind to the baseline side to avoid being pinned high.

• Anytime a player steps away form the post, we then treat him as a perimeter player and deny inside the PACK AREA.

• There can never be a feed to the low post from the top, no exceptions!

• On a catch, we tell our post that this is our time, not the offensive player’s time, but our time. We must quickly slide behind the post on “air-time” – do not reach or gamble for a steal, but work to immediately position ourselves slightly to the baseline side with a half-step of cushion between our defender and the offensive player, maintaining a position between the post and the basket.

• From our position behind the low post, we will defend the ball in one of three ways:

1) Play the post one-on-one from behind – do not give up a scoring angle forcing the offensive player to score over our defender, not through our him. Our post defender must keep his hands at shoulder height with his fingers pointed upward. We teach our post to employ a one step cut-off in this area, using his chest to level off the dribble, take the hit and force the tough shot.

2) Choke the Post – our perimeter players located on the ball-side will open to the ball as it is passed and give help to the post defender. We can dive in and out to bother the post and choke the post only if he puts the ball on the floor, or we can full-out choke the post, immediately diving to the ball and digging it out, forcing him to throw the ball out to the perimeter. Obviously, if our perimeter defender is defending a dead three or a great scorer, we may determine not to choke with his defender, but only to bluff help.

3) RED THE POST – Double the post Big to Big. This is probably our most often utilized method of defending the post, and our most effective. It is a way in which we can force the ball back out of the scoring area, while creating turnovers.

You can download more of his defensive philosophy here: Jim Boone Pack Line Defense

Chris Holtmann Conversion Defense System

By Brian Williams on January 29, 2017

I am a big believer that half court defense starts full court and that you can’t be a great defensive team without being great in converting to defense to force your opponent to play against your half court defense.

The video is 5 minutes of Ohio State Coach Chris Holtmann going through his Conversion Defense System.

His system utilizes the 3 rebounders to the offensive glass when the shooter lifts for the shot, along with a fullback and halfback. Coach Meyer called the 3 offensive rebounders the “tailbacks”

Coach Holtmann goes into the initial roles for the fullback and halfback.

If you are interested in finding out more about the DVD that the video sample came from, click here:

Chris Holtmann: Stopping the Fast Break – Basketball — Championship Productions, Inc.

Make sure your sound is on as you watch.

The video is a You Tube video.

Click the video to start the presentation.

  • « Go to Previous Page
  • Page 1
  • Interim pages omitted …
  • Page 6
  • Page 7
  • Page 8
  • Page 9
  • Page 10
  • Interim pages omitted …
  • Page 16
  • Go to Next Page »

Primary Sidebar

  • Twitter
  • Facebook
  • Linkedin
coachestoolbox
personaldevelopmenttoolbox
basketballplayerstoolbox
basketballtrainer
athleticperformancetoolbox
coachingbasketball

© Copyright 2026 Coaching Toolbox

Privacy Policy