• Skip to primary navigation
  • Skip to main content
  • Skip to primary sidebar

  • Basketball Plays
    • Ball Screen Sets
    • Horns Sets
    • Man to Man Post Up
    • Man to Man Isolations
    • Backdoor Plays
    • Man to Man 3 Point Shot Plays
    • 2-3 Zone Attack
    • Baseline Inbound Plays
    • Sideline Inbound Plays
    • Combination Defense Attack
  • Drills
    • Defensive Drills
    • Offensive Drills
    • Competitive Drills
    • Passing Drills
    • Rebounding Drills
    • Shooting and Scoring Drills
    • Toughness Drills
    • Transition & Conversion Drills
    • One on One Drills
  • Blueprint
  • Practice
  • Mental Toughness
  • Skill Development
  • Offense
  • Defense
  • Store

Basketball Plays Utah

Basketball Plays Utah

By Brian Williams on June 4, 2012

This play was contributed by Creighton Burns.

He has made coaching stops in four states including Georgia, Indiana, Kentucky, and Michigan at both the high school and college levels.

Coach Burns has coached both Men and Women.


Creighton has received numerous coaching honors including Indiana Basketball Coaches Association Coach of the Year in 1988.


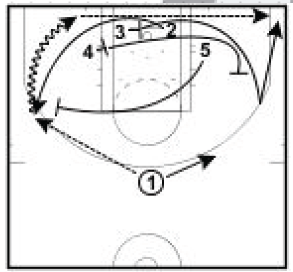
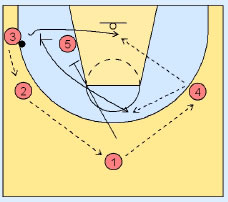
As #1 brings the ball across the time line , #3 slides out toward the sideline as if to get open for an entry pass.

#1 enters the ball to #4 , who steps out from the elbow to the perimeter.


On the pass , #5 and #2 set a staggered double screen for #3.

#3 cuts hard to the ball side corner.

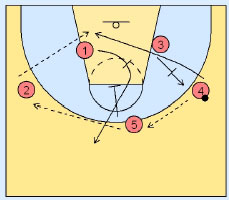
#4 passes to #3 and #2 then sets a second screen , this time screening for #5.

#5 flashes to the ball , and if open , #3 should get him the ball.

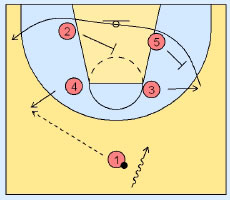
#1 and #4 screen for #2 and #2 cuts to the ball side wing.

After screening for #2 , #4 fills the back side wing , and #1 pops back out to the point.

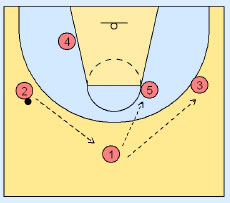
If #5 is not open , #2 starts ball reversal by passing to #2 . If the timing is good and people have done a good job screening , #2 may have a shot opportunity.

If not , #2 will pass to #1 and #1 will swing the ball on to #4.


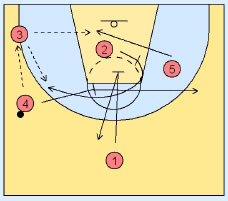
On the pass from #1 to #4 , #5 will back screen for #3 and #3 will run a flex cut to the rim.

After passing to #4 , #1 will down screen for #5 . #4 will look first to #3 and then out to #5 cutting hard to the point.

If #4 passes to #5 , #5 will swing the ball on to #2.

On the pass from #5 to #2 , #1 and #3 will set a staggered double screen for #4.

If #4 is open on his cut , #2 should get him the ball.

After passing to #2 , #5 will down screen for #1 and #3 will fill the back side wing.

#5 will fill the elbow.


The Science of Shooting a Basketball

By Brian Williams on May 22, 2012

I have always felt that the three most important aspects of the flight of a basketball during the shot are

1)      Getting the ball straight at the rim
2)      Arc of the Shot
3)      Shot Depth or Distance from front of the rim.

All of the fundamental teaching and practicing that we do as coaches regarding hand position and body alignment help our players shoot the ball straight.  I measure it visually by seeing where the ball lands on the rim, or by having players shoot the ball on the various lines in the gym and see if it lands straight on that line.  The great thing about shot line is everyone can see it.  The Player and Coach can see clearly if the shot misses to the left or right.

Like everyone else, we work on generating the force necessary to get the ball to the hoop –no offhand interference, bending knees, and flexing the wrist to generate the necessary force to get the ball to the basket consistently.

What I don’t feel that I have been as detailed about is the arc that our players shoot at.  Recently, I have found research data shows us that there are optimal angles.  My evaluations consisted of too flat or too high.  Everyone knows when the ball is shot too flat, it gives the ball less area within the basket to score and this hurts your shooting percentage.  However, most people don’t understand that an arc that is too high hurts your shooting percentage just as much as shooting too flat.   When a player shoots too high, they effectively lose control of the ball and begin missing short and long.    Also, when the ball is shot too high it comes into the rim at a greater velocity making the shot less soft and getting less friendly bounces.

I have learned that a very important piece of the puzzle to understand when trying to work with a player on arc is that they can’t see their own shot.   As pointed out above, when missing L or R the player can clearly see they are not shooting the ball straight.  However, when it comes to arc the player has no idea how high they shoot the ball.   Anyone that is watching the shot can see the arc very well, but the player shooting the ball cannot.   A player should never watch the ball and should be focused on the target, but even if they did they would just see the ball go up in a line and down in a line, having no idea how high it actually went.

For over a decade, Noah Basketball has been conducting studies with the goal of finding the perfect angle and depth inside the rim for a shot to travel.  In addition to learning something about the perfect shooting arc, I also learned something about proper distance (shot depth) for the shot from their research.   That is that a perfect shot travels 11 inches beyond the front of the rim, which is 2 inches past the center.

                Facts regarding the arc of a shot

  • 45 degrees is the optimal arc.
  • 11 inches past the front of the rim is the perfect shot depth.
  • Every great shooter shoots the ball deep in the basket.
  • The best shooters don’t always swish the ball–they often hit the back of the rim.  Noah calls this a BRAD shot, which stands for Back Rim And Down.
  • The best shooters only vary only plus or minus two degrees on shot arc – Building the muscle memory to consistently repeat the shot is critical to great shooting.
  • High-arcing shooters generally are short when they miss while line-drive shooters skew toward being too long on their shots.

The Noah team developed a machine that enables a player to shoot the correct arc and shot depth.  It does this by providing immediate feedback.  When a player shoots the machine will immediately tell them the arc or distance of the last shot.  Since a player can’t see their own shot, this objective, immediate feedback leads to rapid learning.

Noah Basketball will do a FREE, no obligation shooting clinic in your gym, with your players.  During the clinic all players will have their shot evaluated by the Noah System and then a formal presentation will be given that explains the science of the basketball shot.  Click here for more details about the free clinic or call 1-888-TRY-NOAH. During the clinic, players will understand all the principles outlined above for the first time.  I have spoken to several coaches that have hosted one of the free clinics and they say it is well worth the time.

When a player shoots on a Noah, the Noah will announce the exact arc that the ball was shot with.   After a few repetitions, the player can begin to get a feel for what a 45 degree shot release feels like, and what the release feels like when the arc is too flat or too high.

In addition to hearing the arc, the arc and the depth of the shot are captured on a laptop computer so that the player and coach can review the data at the end of their workout.  And they now have a product that allows you to capture all this data on your iPad, iPhone, or Ipod Touch.

The information in this post was taken from the Noah Basketball Website www.noahbasketball.com

Here is a link to an article about the success that Dwyane Wade and the Miami Heat have had with Noah.

http://espn.go.com/blog/truehoop/miamiheat/post/_/id/12263/dwyane-wades-new-magic-number-45

For those of you that want to dig into a little more detail, below are some really interesting charts provided by Noah Basketball that explain some of the details I outlined above.   These charts are also a part of their clinic presentations.

About the best a player can control the arc of the shot is plus or minus 2 degrees.  The chart below shows where the ball travels when a player shoots with the same power at 45 degrees, plus or minus 2 degrees.  There is a sweet spot at 45 degrees where a player can have a reasonable amount of variation in their shot, but the ball still go the same distance within the basket.   This is why all the great shooters shoot the ball at or very close to 45 degrees.

Coaching Basketball

About the best a player can control the arc of the shot is plus or minus 2 degrees.  The chart below shows where the ball travels when a player shoots with the same power at 55 degrees, plus or minus 2 degrees.  If a 55 degree shooter misses slightly and shoots the next shot at 53 degrees with the same power, the ball goes 7 inches farther, making it miss long.  These high shooters will always “spray” the ball from the front of the rim to the back of the rim.  This is a problem that they will not overcome with more reps, better mechanics, etc., etc.    They are fighting the very laws of physics – a battle they will not win.

Coaching Basketball

All great shooters shoot the ball deep in the basket.  The chart below outlines the shooting percentage of a typical shooter based on their average shot depth in the basket.  As you can see, a shooter will make the most shots at 11 inches deep in the basket.   There are so many shooters that are losing 20 to 25 percentage points just because they aren’t shooting the ball deep enough in the basket.

Coaching Basketball

The Coaching Toolbox has hundreds of resources for coaching basketball including basketball practice, basketball plays, basketball drills, basketball quotes, basketball workouts, basketball poems, and more!

Basketball Plays: Spurs Set Play

By Brian Williams on May 21, 2012

From an Arizona Basketball Coaching Newsletter:

If you are interested in being added to his newsletter, let me know this information (which the Arizona staff requires):

1) Name

2) e-mail address

3) school/team

4) Coaching Position

The plays were contributed to their newsletter by Brandon Rosenthal.

SAN ANTONIO STAGGER P&R (TWO OPTIONS)

Basketball Plays

(3) & (4) stagger screen for (2). (1) hits (2) and cuts away.

(3) cuts out to the wing and (4) searches the lane.  (5) sprints into side pick and roll.

Option 2 below is if (2) turns down the ball screen from (5), then (4) flair screens for (3).  (3) cuts to the corner for a 3 point shot.

Basketball Plays

Basketball Plays

#4 steps out and receives On the pass from #rim.

The Coaching Toolbox has hundreds of resources for coaching basketball including basketball practice, basketball plays, basketball drills, basketball quotes, basketball workouts, basketball poems, and more!

Point Guard Qualities

By Brian Williams on May 17, 2012

I received these notes from Weber State AssistantPhil Beckner.

Offensive Concepts/Point Guards

By: NBA Great Gordon Chiesa

Follow him on twitter: @gchiesaohmy

The NBA is a Point Guard driven league.

The hardest position in the NBA to learn and master is the “point guard position”.

About Point Guards…There are two kinds of Point Guards: 1) “New School,” aggressive, looking to score points early, by creating off the dribble; 2) “Old School”, trying to execute the offense first by getting other players shots early. As the shot clock is winding down, then being more aggressive.

The Point Guard position is about “winning intangibles.” The best ones make it special by their assists, leadership, clutch shooting, and defense!

About NBA Point Guards: You never want your point guard to be so “Shot Happy”, that he doesn’t or won’t get his teammates involved first in the flow of the “Team Offense”.

Good NBA Point Guards will always see the floor, control the tempo of the game, make timely jump shots, and uncanny lay-ups in the lane.

Good point guards should have an assist to turnover ratio of 3 to 1.

Good NBA point guards play the game “one pass ahead”. They feel/see the “play” before it happens.

Bright Point Guards learn to limit their own personal “emotional fogs” during games by playing forward, not backwards. Stay focused to lead!

Winning Point Guards respect the ball.  Their focus is to get as many offensive possessions possible by not committing “reckless turnovers”.

Smart point guards understand how/when to count internally, when the shot clock is winding down.  This “mental countdown” creates confidence.

Elite Point Guards master the intellectual, physical and verbal challenges of playing the position by consistently making “big plays”.

Winning, scoring point guards have that “instinctivemental balance” of understanding when to look to score, and when to get their teammates going.

Solid back-up point guards have an underrated impact towards winning by being ready to play due to injuries, foul trouble, and speed match-ups!

Electric Point Guards add value to their teams by scoring and creating in the open floor. They’re “tempo changers” of velocity and emotions.

The Coaching Toolbox has hundreds of resources for coaching basketball including basketball practice, basketball plays, basketball drills, basketball quotes, basketball workouts, basketball poems, and more!

Competitive Basketball Practice

By Brian Williams on May 16, 2012

These concepts came from Coach Mike McNeil with the Comments by Alan Stein.

Some great stuff from Mike McNeil on ideas to make players more competitive in practice which translates into them going harder for longer period of times — really good stuff from Coach McNeill — thanks for sharing!

I (Alan Stein) have put my thoughts after each one in red italics.

Many years ago I had the opportunity to ask Gary Williams, the Head Coach at University of Maryland, what was the most important quality he looked for in the players he was recruiting. I was thinking he was going to say something like size, quickness, shooting ability, or understanding of game, but instead he looked at me like I must be from another planet, and said “they have to be a competitor”.  As a coach you want to believe that every contest you go into you know your players will give it everything they have to perform well.

The team may not shoot well, or they may turn the ball over but at least you know they will compete on every possession. While many people believe you cannot make non-competitors into competitors, I disagree to a certain point. I think if you use proven strategies in practice you can improve the competitive fire in all your athletes.  Are you going to make an infrequent competitor into a consistent, hard-nosed tough competitor? – I doubt it; but you can improve each of these athletes.

Just like any skill you work to improve you can help each athlete compete harder and more consistently by using some of the strategies described below. It is your responsibility as a coach to help your athletes become the best competitors they can become. Therefore you must create a practice environment where competition is expected and embraced.

A critical aspect of competing is being in the present – not thinking ahead and letting the past go. Coaches must teach, preach, and demand that players focus on the present responsibilities each player has so they will compete better. The following is a list of strategies that can be used to teach your team to play hard and to compete every possession.

1. The coach is the only one to call fouls. The coach can then set the standard of play. While it is important to teach players to play without fouling it is equally important to teach players to play through fouls, to play physically, and to play aggressively. It is also important players not concern themselves with the officials.

Alan’s comment:  We do this as well…when scrimmage against our male team; we will let them foul a little more than we allow our team…we want to be aggressive on defense without fouling.

2. There is no out of bounds! If the ball bounces out of the normal boundaries of the court the play is still alive. The players will then hustle after the loose ball to maintain possession. This will keep kids hustling after the ball. There are two arguments I have heard against this concept: 1) kids will get hurt –in 20+ years I have not seen it happen; 2) they will not be aware of where the out of bounds lines are –
again, I have not seen this be a factor.

Alan’s comment: We have several drills where we utilize this principle…we don’t do it all the time because we want them to know the floor as well.

3. Make every scrimmage or drill a competition; all competitions have either a score or a time standard.  Examples, you must make so many lay-ups in a 3 player weave in 2 minutes or first team to five baskets. The consequences for losing are severe if the losing team did not compete very hard – set of lines, suicide, 60 seconds. If the losing team did compete hard make it a less severe penalty or no penalty.

Alan’s comment: We are very big believers in this one — hold them accountable and have a penalty for the losing team. We do it in individual drills as well as team drills.

4. Play every drill, scrimmage, and breakdown until the defense gets the ball, i.e. if the offense scores and then recovers the ball from the basket they can score again. Our guideline for this is that we always want to convert as least one time (sometimes twice).

Alan’s comment: We might be working on our half-court offense but we are going to have one transition before resetting. The conversion game is very important to teach and it allows your team to play through all possessions.

5. Use overload situations, 3 vs 4, 4 vs 5, 5 vs 6. This places extra pressure on the out-manned team to concentrate and play harder to compensate for out-numbered situation and it also places pressure on the team with the numerical advantage because the expectation is to win. Give the team with the numerical advantage a slight score disadvantage to start each drill. We refer to these as “Disadvantage Drills.”

Alan’s comment: We may play 5/4 with the offense getting an extra player to overload the work on our defense. We might play 4/4 with no dribble to place our offense in a more difficult setting. There are a variety of ways to “stretch’ your team in competitive situations.

6. Use a rebounding bubble. Because no baskets are scored – score with stops, rating of shots and offensive rebounds. This will increase the hustle to secure the ball.

Alan’s comment: We use the rebounding bubble early in the season quite a bit. It is one of the most physically aggressive things we do. We tend to stay away from it during the season because of the possibility of injuries.

7. Give extra points for offensive rebounds. When you scrimmage or play any drill if a team gets an offensive rebound they get 2 extra points. Offensive rebounding is about desire and hard work – this should be rewarded!

We play “Motion Game” where we use points in a variety of ways. An offensive rebound is worth 1 point. A turnover is worth 2 points to the defense. In fact, you can utilize that drill in a variety of ways.  Maybe you want to work on your low post defense so you give the offensive a point for a low post feed.  A great imagination can make this type of scrimmage setting very effective.

8. Reward the team with extra points whenever there are hustle plays such as diving on the floor or drawing a charge.

The Coaching Toolbox has hundreds of resources for coaching basketball including basketball practice, basketball plays, basketball drills, basketball quotes, basketball workouts, basketball poems, and more!

Lawrence Frank Defensive Concepts

By Brian Williams on May 10, 2012

Lawrence Frank (former Coach Detroit Pistons and New Jersey Nets) – Defensive Concepts

I received these notes from Coach Steve Smiley.

“Your every day habits will determine your execution.”

To play on a good defensive team you must:
a. be a good individual defender.
b. be a good team defender.
c. be both a & b.
** If neither, you won’t play! **

Defensive non-negotiables:
1. Sprinting back on defense.
2. Protecting our paint.
3. Closing out hard and contesting the shot.
4. Playing aggressively without unnecessary fouls.
5. All five players blocking out and rebounding.
** No Layups
** No Freethrows
** No corner 3’s

If the ball gets into the paint, what are the consequences for the offense?
1. Charge
2. Steal
3. Deflection
4. Blocked shot
5. Hard “NBA” foul
** Never mention anything about scoring!

Transition Defense:
1 back = Dunk
2 back = Layup
3 back = Jumper
4 back = Got a chance
5 back = GAME ON!
– Win the first 3 steps!
– Stop the ball above the 3-point line
– Get the ball out of the middle 1/3
– Think “help”
– Open shots beat you in transition, but mismatches rarely will.

“Accept who they are. Your job is to make them better than they were.”

The Coaching Toolbox has hundreds of resources for coaching basketball including basketball practice, basketball plays, basketball drills, basketball quotes, basketball workouts, basketball poems, and more!

  • « Go to Previous Page
  • Page 1
  • Interim pages omitted …
  • Page 257
  • Page 258
  • Page 259
  • Page 260
  • Page 261
  • Interim pages omitted …
  • Page 288
  • Go to Next Page »

Primary Sidebar

  • Twitter
  • Facebook
  • Linkedin
coachestoolbox
personaldevelopmenttoolbox
basketballplayerstoolbox
basketballtrainer
athleticperformancetoolbox
coachingbasketball

© Copyright 2026 Coaching Toolbox

Privacy Policy