• Skip to primary navigation
  • Skip to main content
  • Skip to primary sidebar

  • Basketball Plays
    • Ball Screen Sets
    • Horns Sets
    • Man to Man Post Up
    • Man to Man Isolations
    • Backdoor Plays
    • Man to Man 3 Point Shot Plays
    • 2-3 Zone Attack
    • Baseline Inbound Plays
    • Sideline Inbound Plays
    • Combination Defense Attack
  • Drills
    • Defensive Drills
    • Offensive Drills
    • Competitive Drills
    • Passing Drills
    • Rebounding Drills
    • Shooting and Scoring Drills
    • Toughness Drills
    • Transition & Conversion Drills
    • One on One Drills
  • Blueprint
  • Practice
  • Mental Toughness
  • Skill Development
  • Offense
  • Defense
  • Store

Delta High School Transition Defense to Transition Offense Drill

Delta High School Transition Defense to Transition Offense Drill

By Brian Williams on July 17, 2020

Contributed by Derek Sheridan, Head Boys Coach Delta High School (Delta, Ohio)

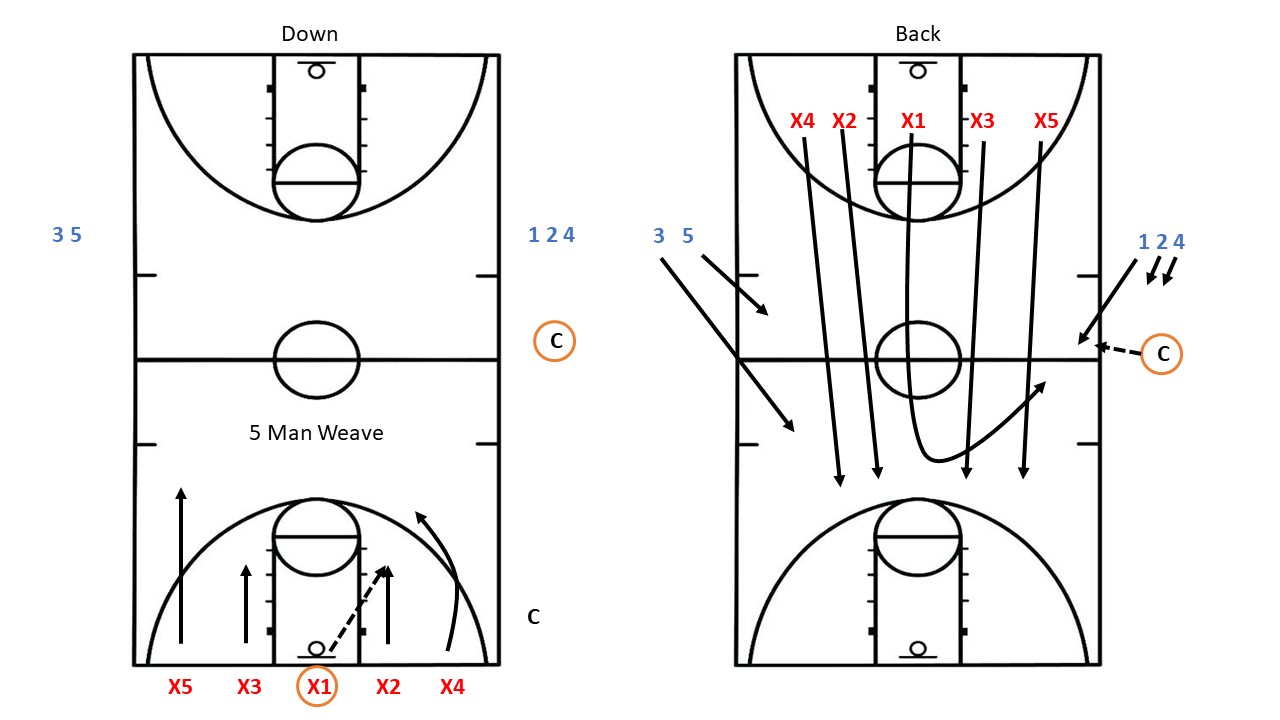
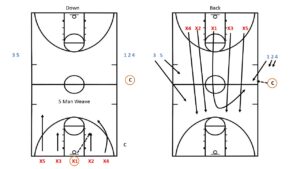
  1. Assistant coach (with a ball) has PG, 2-G, & 4-Man on one side of the court & 3-Man, & 5-Man on the opposite side. All 5 players are FT line extended, opposite of the 5 players executing the 5-Man Weave.
  2. Head coach has 5 players on the opposite baseline, ready to execute a full-court 5-Man Weave (down only).
  3. On the head coach’s cadence his/her players sprint into a 5-Man Weave. All 5 players must cross the opposite FT line extended.
  4. As the lay-up shot hits the bankboard, the assistant coach yells “Go,” and passes the ball to the PG who is with his group of 5. All 5 players sprint in transition offense & all 5 players who were in the weave must sprint back in transition defense & get a stop (they do not have to get the rebound from the lay-up shot).
  5. If the defense earns a stop, they will immediately transition to the opposite end on offense & the opposing players sprint back in transition defense.
  • The manager has on the left side of the scoreboard a number indicating how many passes the offensive players must make (unless they can score a lay-up from their transition offense).
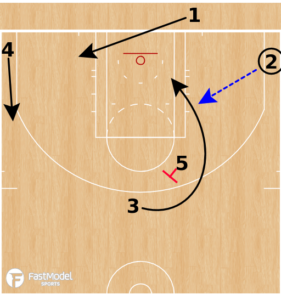
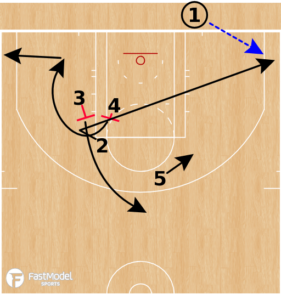
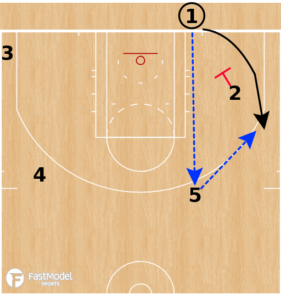
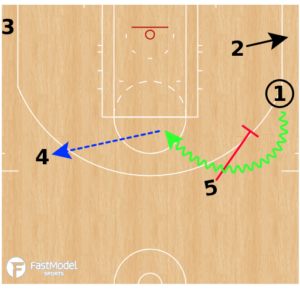
  • The right side of the scoreboard lists a number indicating the number (1, 2, 3, 4, 5) of the player who must score, or the number of the set they have to execute if they cannot score out of their transition offense. We mix up using numbers that indicate who can score or what set to execute.
  • All out-of-bounds situations are played – using the teams BLOB/SLOB plays.
  • All fouls are 1 & 1 Free throws.
  • Each day the offense has the opportunity to score “Triple Points.” The coach will prescribe what action will lead to triple points.  Triple points could come from certain players scoring, scoring off a certain set, scoring off a certain action (backdoor, lob, flare cut, curl cut, skip pass, etc.)

  1. If the players in the weave did not get a stop, then the drill is re-started and played out until a defensive stop is secured.
  2. Each segment of the drill is ran down, back, and stop/realign into the drill. Teams alternate between weaving back to transition offense & starting on the sideline with the assistant coach.
  3. First team to 21 points wins.
  4. Scoring:

    Defense
    Stop = 1
    Stop & obtained the 1st rebound = 2
    Charge =3
    Force a turnover =3

    Offense
    2 pt. FG = 1
    3 pt. FG = 2
    Offensive Rebound = 3
    Trip Points = 6 or 9 pts.

DHO Drift Kick Back Shooting Drill

By Brian Williams on July 15, 2020

This skill development drill is provided by Dr. Dish Basketball.

The drill is coached by Jordan Petersen of Ellsworth HIgh School and Positionless Basketball.

You can and should modify any of the drills to make them fit your needs or to add variety to your skill development work.

Please make sure your sound is on to see the video.

This drill is hosted on You Tube, so you will need to be on a server that allows you to access You Tube to see the drill.

Click the play arrow so see the drill.

1-3-1 Defensive System

By Brian Williams on July 14, 2020

Contributed by Coach Jonathan Klein

If you would like me to put you in touch with Coach Klein to ask him any questions, please let me know.

This post includes his thoughts on adjustments, rebounding, defending baseline inbounds plays, and pressing out of the 1-3-1.

1-3-1 ZONE DEFENSE OVERVIEW

ADVANTAGES
➢ Forces the offense to adjust to your defense
➢ Forces the offense into slow passes (Lobs and Bounce passes)
➢ Creates pressure on perimeter players
➢ Causes the offense to make bad passes and force bad shots / shot choices
➢ Easily creates and flows into fast break opportunities
➢ Can be easily adjusted to fit your personnel or opponent

DISADVANTAGES
➢ Risky defense that will allow the offense to beat you if you make a lot of mistakes
➢ No balance when blocking out on a shot

PHILOSOPHY
➢ Make the offense uncomfortable through constant pressure on the ball and the passing / driving gaps
➢ Keep ball out of the middle of the floor
➢ Close the gaps and not allow any easy passes or drives
➢ Forcing every pass to be a slow lob or bounce pass
➢ Never allow a baseline drive
➢ Play with high energy and maximum effective effort

POSITION PROFILES / RESPONSIBILITIES

Taker (Shown as 4)
✓ Get and keep the ball out of the middle of the floor
✓ If they try to drive across the middle, deny and force them back outside the volleyball lines
✓ Play between the top two offensive players
✓ Make it as hard as possible to reverse the floor
✓ Play the goal side to force the sideline to sideline pass towards the half-court line
✓ If ball is passed into the corner – protect the ball side elbow / high post area

Center (Shown as 5)
✓ Stay between the ball and the rim
✓ If ball is on baseline – sprint down and play high side on the block
✓ If ball is drove –step up and stop the ball
✓ Will play high post according to which adjustment we are in

Wings (Shown as 2 & 3)
    Ball Side
✓ Play ball handlers outside shoulder
✓ Stay in line between the ball and whoever is on the baseline
✓ Protect the sideline – not the middle
✓ If the ball handler drives sideline, deny and force them back towards half-court and middle
Weak Side
✓ Number 1 responsibility is to cover the weak side of the rim
✓ Read the ball handlers eyes and shoulders and try to deflect / steal skip passes

Badger (Shown as 1)
➢ Protect ball side low post
➢ Cover both corners
✓ Close-out baseline and force them middle
✓ Run shooters off the 3-point line

DEFENDING THE DRIVE
➢ Force all drives middle and create a funnel with the center and taker / wing or center and badger / wing
➢ Once the ball handler picks up the ball and is “dead”
✓ Center will keep pressure on the ball
✓ The other two players will drop down / back to the most dangerous passes in their areas

BASIC ROTATIONS
The basic rotations of our base 1-3-1 coverage are shown below

Teaching Points:
➢ Everyone must:
✓ Be Active with high hands and constant communication
✓ Play with high energy and maximum effort
➢ The taker must keep ball pressure until the ball is outside the volleyball lines or the ball is dead then they are allowed to fall back towards the middle to play the pass
➢ The ball side wing must play above the top of the key – always forcing the ball out of scoring range
➢ The center will play behind anyone who enters the high post area – if the ball is entered – square up and play man to man until the ball is passed out
➢ The back-side wing must have good anticipation
✓ Play the weak side rim but anticipate and jump the skip passes
➢ The badger and backside wing must “sit down” on anyone in the low post
✓ Play in front and sit down on them with high hands
✓ On a pass in, stay down and back the offensive player up until the ball is coming down then make your play on the ball

1-3-1 HALF-COURT ADJUSTMENTS

Adjustment 1
➢ Extended / aggressive on the perimeter and in the gaps
➢ Keep same positions except the center comes out to top of key to deny the high post
➢ Fast paced, aggressive, gambling defense that thrives on deflections


Adjustment 2
➢ Packed in, strong in the lane, invites perimeter shooting
➢ 4 & 5 both stay in the lane, while 1, 2, & 3 cover entire perimeter
➢ Packed in safe defense that forces outside shots and attacks the boards hard

Adjustment 3
➢ Strong at rim and on perimeter but weak inside
➢ Badger and center switch places so badger plays high post and center plays low
✓ The badger will still cover the corners
✓ The center will stay in the lane playing block to block
➢ The badger will play the high post exactly like the center does in our base zone


Adjustment 4
➢ Change-up defense; start in a 1-3-1 and morph into a 2-3 as the ball enters the corner
➢ Start with base zone alignment / rotations

PLAYING THE 1-3-1 ON BLOB SITUATIONS

Alignment 1

➢ Pinch ball side with center and ball side wing
➢ Badger denies cross court pass and helps cover rim
➢ Back side wing covers weak side rim
➢ Taker plays middle of the floor out – read eyes and shoulders
➢ After ball is inbounded rotate into normal zone coverage


Alignment 2

➢ Deny ball side corner with ball side wing
➢ Pinch ball side rim with badger and center
➢ Back side wing plays weak side rim
➢ Taker plays middle of the floor out – read eyes and shoulders
➢ After ball is inbounded rotate into normal zone coverage


Rebounding from the 1-3-1

Rebounding out of the 1-3-1 is based on covering areas – not people
Sprint to the area you are assigned then box out whoever enters your area
Attack your Area and Get the Ball!

We should ALWAYS have:
1 player on the Shooter
1 Boxing Out Ball Side
2 Boxing Out Backside
1 Crashing Middle

If a shot goes up from the corner we hit the shooter then look to leak out for a fast break opportunity

PRESSING OUT OF THE 1-3-1

Press 1 – Over


➢ Trap from the middle and rotate help from the backside
➢ Do not engage the front person until the ball crosses the ft line
➢ Ball side wing must never let the pass go over their head
➢ Taker still plays middle and forces sideline
➢ Center get to sideline and seal the trap
✓ Goal is to trap dead corner across HC line (not a huge problem if it doesn’t happen)


Press 2 – Up

➢ Trap from the sideline and rotate help from the backside or the middle (keep them guessing)
➢ Do not engage the front person until the ball crosses the FT line
➢ Ball side wing stunts and retreats ball handler to make them hesitant
➢ Taker still plays middle and forces sideline

4 Flat BLOB Series

By Brian Williams on July 9, 2020

Army Men’s Assistant Coach Zak Boisvert has assembled some dubs of baseline inbound plays used by Chris Mack when he coached at Xavier.

Zak has an outstanding site with posts on various coaching topics at www.pickandpop.net

His YouTube channel has several videos with various types of man to man plays, zone sets, and inbounds plays as well as clips on various defensive coverages.

You can subscribe to receive an update when he posts a new video Zak Boisvert You Tube Channel

You can follow him on Twitter at this link: @ZakBoisvert

Click play to see the video

This is a YouTube video, so you will need to be on a server that allows you YouTube access.

There is narration with this video, so please make sure your sound is on.

“Majerus Closeouts” Drill

By Brian Williams on June 30, 2020

This video is with Coach Chris Holtmann demonstrating a closeout drill that he learned from Rick Majerus.

You can certainly change the drill to fit your needs and or change it so that several baskets are going at once to get all players involved in a shorter amount of time.

You will need to be on a network that allows you to access YouTube to view the video.

Click the play arrow to view the video.

There is narration with the video, so please make sure that your sound is on.

You can find out more about the Championship Productions video that this clip is from at this link: Drills to Build Your Man to Man Defense.

The video with Coach is available in both DVD and online format.

Click the play arrow to start the video.

2 Baseline Inbound Plays

By Brian Williams on June 26, 2020

These 2 baseline inbound plays were contributed to the FastModel Sports Plays and Drills Library by Menelik Fernandes.

Menelik is the head coach at Fleming College (Peterborough, Ontario, Canada)

The plays were posted at:

Austin Spurs-BOB – FastModel Sports.

and

Agua Caliente-BOB – FastModel Sports.

You can also find out more about FastModel Play Diagramming software by clicking this link: FastDraw

1-4 are interchangeable height wise on this play

3+4 both briefly fake a screen for 2

2 misdirects and comes ball side corner

4 curls off of 2’s back to the weak short corner

4 then exits

3 pops to the high rimline area

5 walks towards the elbow

1 passes to 2

1 enters to the help side block

5 butt screens

3 curls off of 5

2 passes to 3

4 lifts


2 cuts over the top of 4 and 5

4 and 5 both space to the slots


1 passes to 5 because there is no shot for 2

2 pins for 1

1 enters and gets a wing pass from 5


2 spaces and becomes the shake

5 turns the pass into pass and pick action

1 attacks the nail

1 passes to 4 for a make if x4 is tagging

  • « Go to Previous Page
  • Page 1
  • Interim pages omitted …
  • Page 27
  • Page 28
  • Page 29
  • Page 30
  • Page 31
  • Interim pages omitted …
  • Page 288
  • Go to Next Page »

Primary Sidebar

  • Twitter
  • Facebook
  • Linkedin
coachestoolbox
personaldevelopmenttoolbox
basketballplayerstoolbox
basketballtrainer
athleticperformancetoolbox
coachingbasketball

© Copyright 2026 Coaching Toolbox

Privacy Policy