• Skip to primary navigation
  • Skip to main content
  • Skip to primary sidebar

  • Basketball Plays
    • Ball Screen Sets
    • Horns Sets
    • Man to Man Post Up
    • Man to Man Isolations
    • Backdoor Plays
    • Man to Man 3 Point Shot Plays
    • 2-3 Zone Attack
    • Baseline Inbound Plays
    • Sideline Inbound Plays
    • Combination Defense Attack
  • Drills
    • Defensive Drills
    • Offensive Drills
    • Competitive Drills
    • Passing Drills
    • Rebounding Drills
    • Shooting and Scoring Drills
    • Toughness Drills
    • Transition & Conversion Drills
    • One on One Drills
  • Blueprint
  • Practice
  • Mental Toughness
  • Skill Development
  • Offense
  • Defense
  • Store

Basketball Drills Four and Five Man Break

Basketball Drills Four and Five Man Break

By Brian Williams on October 17, 2014

Today’s post was submitted by Alan Peel of CoachPeelBasketball.com

Hope this gives you some thoughts as to what you can do with your warmup and or conditioning portions of practice that utilize your full court transition and or press break systems. I have always felt that anytime you can involve handling the basketball. drilling your schemes, and competition in conditioning. Putting a time requirement to complete the drills is another way to make them competitive and hold players’ attention.

I also like the idea of setting “standards of execution” for your warmup and conditioning drills requiring concentrating on a specific number of perfect passing and catching, layups, and all other areas of execution or requiring the players to repeat the drill. It stresses the importance of concentrating on every drill.

Four and Five-Man Break Drills

By Alan Peel, CoachPeelBasketball.com

Two of the warm-up drills that I have done in the past to build a transition offense are Four-Man Break and Five-Man Break. These drills get your players to learn how to run the floor, are great conditioners early in practice, and place an emphasis on footwork and finishing with lay-ups in transition.

Like Three-Man Weave, these two drills require the players to make a predetermined number of lay-ups or consecutive lay-ups without making a mistake. If a ball hits the floor for any reason, a player uses the incorrect hand in shooting a lay-up, a player travels, or a player runs the drill incorrectly, the lay-up does not count even on a made lay-up.

Four-Man Break

Diagrams created with FastDraw

basketball-drills-break1
Diagram 1
basketball-drills-break2
Diagram 2

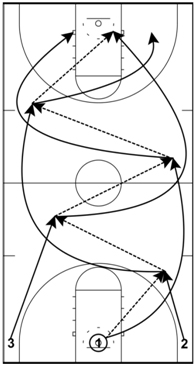
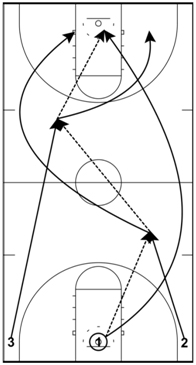
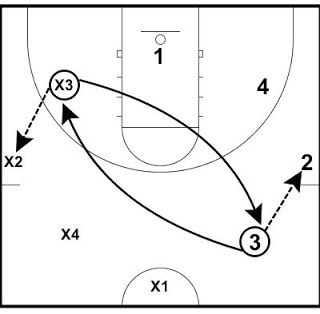
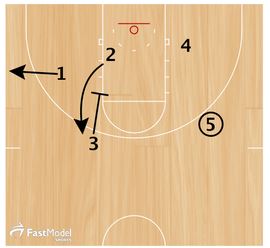
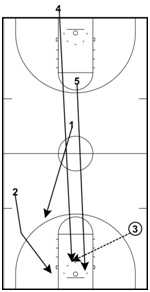
Four-Man Break requires a point guard, two wings, and a big. Any player can play any position in the drill.

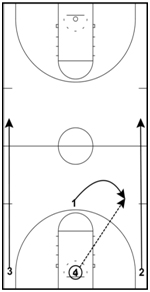
The wings (#’s 2 and 3) will start the drill in the corners, the point guard (#1) will start at the top of the key, and the big (#4) will start near the basket. The drill begins as shown in Diagram 1 with #4 throwing the ball off of the backboard and grabbing the rebound. #1 will then get into a position to receive the outlet pass from him and look to pass up the floor.

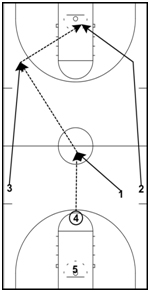
#1 will look to pass the ball up the floor to either wing. If, as Diagram 2 shows, the wing receiving the pass cannot score the lay-up, he will pass it back to #1 who will then pass to the opposite wing. If the wing with the ball can score the lay-up, he will shoot the ball.

basketball-drills-break3
Diagram 3
basketball-drills-break4
Diagram 4

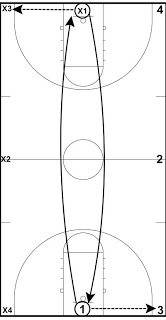
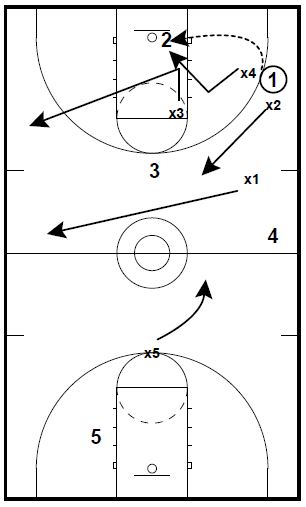
The sequence will begin again with #4 taking the ball out of the net, stepping out of bounds, and inbounding the ball to #1 (Diagram 3). We also want the wings to cross between the backboard and the baseline.

We will go up and back twice with the big man who inbounded the basketball to start the last trip to score the lay-up to end the sequence (Diagram 4). As soon as we have made the required number of lay-ups to finish the drill, we will then move on to Five-Man Break.

Five-Man Break

basketball-drills-break5
Diagram 5
basketball-drills-break6
Diagram 6

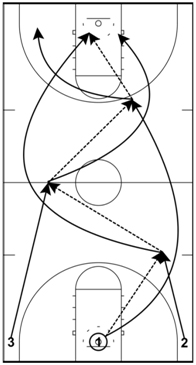
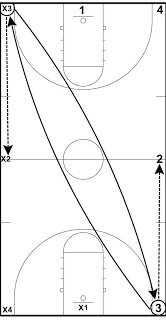
Five-Man Break requires a point guard, two wings, and two bigs. Like the four-man break drill, any player can play any position.

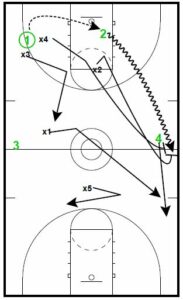
There are notable differences between Four-Man break and Five-Man Break. The first of these is to whom the first big (#5) will pass the ball to once he collects the rebound. Instead of passing to #1 on the outlet, he will instead pass the ball to the other big (#4) to simulate a pressure release (Diagram 5). Once #4 receives the ball, #1 will cut to the middle of the floor and look for the pass from #4 before passing to the wing on the opposite side (Diagram 6).

Another difference, also illustrated in Diagram 6 is that instead of passing the ball back to the point guard, we want the wing who receives the ball from the point guard to make a cross-court pass to the other wing. The second

basketball-drills-break7
Diagram 7
basketball-drills-break8
Diagram 8

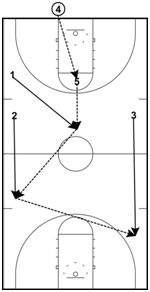
wing to touch the ball will score the lay-up if he can do so without traveling.

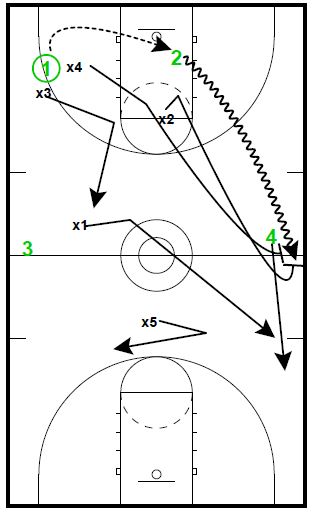
The first big man down the floor will inbound the basketball on the trip back each time (Diagram 7). We will repeat the sequence with the wings changing sides of the floor by crossing between the backboard and the baseline. Also, we will have the bigs changing responsibilities based on who gets down the floor first. The first big down will take the ball out of the basket, step out of bounds, and inbound the ball to start the trip back.

Any given sequence with Five-Man Break ends with the last big man down the floor on the second trip back scoring the last lay-up (Diagram 8). As soon as we have made the required number of lay-ups to finish the drill, we are done with Four- and Five-Man Break.

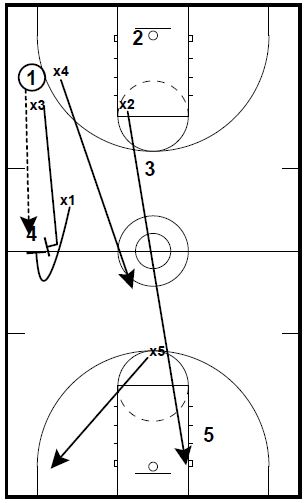
Click here to see Coach Peel’s version of the 3 man weave full court

Basketball Drills Three Man Weave

By Brian Williams on October 16, 2014

Three Man Weave

By Alan Peel, CoachPeelBasketball.com

At the start of practices, you want to have a good warm-up drill that gets your players engaged and works on building your team’s running game. I have used a three-man weave drill in my time as a coach that have worked on passing, footwork, running the floor, and shooting lay-ups effectively.

These are untimed drills for the players. Instead, we want the players to make a predetermined number of lay-ups or consecutive lay-ups without making a mistake. If a ball hits the floor for any reason, a player uses the incorrect hand in shooting a lay-up, a player travels, or a player runs the drill incorrectly, the lay-up does not count even on a made lay-up.

On all of these drills, players should pass and go behind the player who received their pass. The keys to the drill are to stay wide when running the floor, run the floor hard, and to lead the receiver with the basketball. Coaches should emphasize that if the ball is in the air coming toward them, use a jump stop to get under control with the mantra of “ball in the air, feet in the air”.

The first segment of the drill is with five passes before a lay-up is attempted (Diagram 1). Once the players have made the specified number of lay-ups, the number of passes will be reduced to four (Diagram 2) and then to three once the specified number of lay-ups has been made (Diagram 3). After the specified number of lay-ups has been made for the three-pass three-man weave, the drill is completed.

Diagrams created with FastDraw

basketball-drills-three-man-weave1

basketball-drills-three-man-weave2

basketball-drills-three-man-weave3


During the drill, the players will count out how many passes they make before shooting the lay-up. The job of the coaches are to count the number of lay-ups made and to make sure the drill is being run correctly. The coach will not stop the drill once it begins for any reason other than if a player is injured.

It should also be noted that this drill will not look good early on, but your team will get better at running it as you give it more time. The best way for them to get better at it is to do the drill daily. If you have a younger team, you will want to start with having them make a specified number of lay-ups early in the season. Later in the year, if your team is experienced and good enough, have the players make a specified number of consecutive lay-ups.

Effective Field Goal Percentage

By Brian Williams on October 15, 2014

Brian Williams, The Coaching Toolbox.

Statistical analytics is playing a much bigger role in basketball at all levels and I think is going to continue to play a bigger and bigger role in how coaches evaluate their teams in both games and practices, how they develop their systems of play, and how they scout and prepare for upcoming opponents.  Here is one thought on having a more useful statistic than straight shooting percentage.

I used to look at a player’s scoring effectiveness as being ineffective if they did not score at least one point for each field goal attempted.  Defensively, we felt that if we held the other team’s top scorers to less than a point a shot, we had a great chance to win.  That also meant that we were not fouling and they were not getting to the line.  One of our player’s (who is now a coach by the way) said that when using this method of evaluation, free throws made were “extra credit” because they didn’t count against the shots taken..

However, that criterion was not very effective in evaluating our team’s performance.  If a player that was not one of our top scorers, or one who didn’t get a lot of playing time, took 4 field goal attempts, he needed to score at least 4 points to not be a negative for our offense.

But, I didn’t like it to measure our leading scorers. If our leading scorer took 18 shots and scored 17 points, that met the criteria that he wasn’t “hurting the team”, but that performance was not going to win against quality opponents.

Here is one stat that I have found to be much more useful in evaluating who are our most efficient scorers from the field.

EFFECTIVE FIELD GOAL PERCENTAGE

I first read about Effective Field Goal Percentage in Dean Oliver’s Book “Basketball on Paper: Rules and Tools for Performance Analysis”

In my opinion, when looking at statistics, Overall Field Goal Percentage is not a useful statistic to judge your player’s shooting efficiency since it combines both two and three point shots to calculate the percentage.  Individual two point percentage and individual three point percentage will tell you how a player does at both ranges separately.  But, to get a comparison of how effective a player is who shoots mainly twos compared to a player who shoots mainly threes is the old apples to oranges comparison.

What you really want to know is: Who is producing the most points for your team for each shot that they take.

To accomplish that, Effective Field Goal Percentage is a more useful statistic than Overall Field Goal Percentage to use.  Effective Field Goal Percentage counts every three point shot made as one and a half makes since each three point shot scores one and a half times the number of points that a two point shot does.  It provides for a more level comparison for which players are scoring the most efficiently from the field. 

It gives you a scoring percentage as opposed to a “shots made” percentage.

The formula for effective field goal percentage is:

eFG% = (2FGM + 1.5*3PFGM)/FGA

2FGM = Two point field goals made
3FGM = Three point field goals made
FGA = Total field goals attempted (including both two and three point attempts)

In words, multiply the 3 point field goals made by 1.5. Then add the two point field goals made.  Take that total and divide it by the total number of field goals attempted (both 2s and 3s) to determine the Effective Field Goal Percentage.

Again, The reasoning used for multiplying three point shots made by 1.5 is that each one counts as one and a half as many points as does a two point shot.

Here is an example.  A player is 4 for 9 on 3 point attempts and 5 for 10 on 2 point shots.

4 three point shots made * 1.5 = 6.  Then, add 5 for the two point shots made which gives us a total of 11.  Divide that by the total number of field goal attempts which was 19.  The Effective Field Goal Percentage is 11/19 = 57.9%.

The player’s Overall Field Goal Percentage is 9 shots made on 19 attempts which is 47.4%.  In my opinion, that percentage is deceiving as to how much that player really helped your team from the field.

A  player shooting only two point shots and no threes would have to shoot 58% to be more “effective” from the field than the player in the example.

The first few times I looked at Effective Field Goal Percentage (EFGP), it was a little confusing (and my undergrad degree is in math J ), But after looking at it closely, it made more sense as a measure than the traditional overall field goal percentage.  It allowed me to compare how well we were scoring from the field and which players were the most effective from the field.

I will have another post soon that will detail “True Scoring Percentage” which is a stat that takes into account a player’s ability to get to the line and score, combined with scoring efficiency from the field.

Basketball Drills Argentine Passing

By Brian Williams on October 14, 2014

Here is an idea if you for a conditioning drill that also involves handling the basketball.

The drill can be done half court or full court depending on what you want to accomplish with the drill and

The drill continues in similar fashion for one minute on the clock.

If the ball hits the ground, passes are not caught cleanly, traveling, or any other error, the one minute is put back on the clock and the drill starts over. Or, you can add time each time there is a turnover.

You can change the time or the requirements to complete the drill without starting over to fit your needs.

In addition to the diagrams, there is a video below of the Maryland Women’s team running the drill.

Diagrams created with FastDraw

Argentine-Passing-Drill-Half-Court

8 players are in the drill.

Players of same numbers are partners. 1 is matched with x1, 2 is matched with x2, 3 with x3, 4 with x4.

1 and x1 each start with a basketball.

The drill starts out with the players who have the basketballs passing to their right. 1 passes to 3 and x1 passes to x3.

After making the passes, the 1s sprint and change spots.

Players need to be aware of the other players in the middle to avoid collisions.

Argentine-Passing-Drill-Half-Court2

The drill continues with 3 passing to 2 and x3 passing to x2

The 3s, then change positions.

The drill continues in similar fashion for one minute on the clock.

If the ball hits the ground, passes are not caught cleanly, traveling, or any other error, the one minute starts over.

You can change the time or the requirements to complete the drill without starting over to fit your needs.

The drill can also be done full court.

Argentine-Passing-Drill-Half-Court3

Argentine-Passing-Drill-Half-Court4

In the full court version, obviously the players at half court have a shorter distance to run and the players in the corner have longer to run.

If you have more than 8 on your squad, you can put players behind in the corners and under the basket (so that you have 2 in each of those spots) to make the running more equal.

Below is a video of the Maryland Women’s team running the drill full court.

I like the idea of keeping the players inbounds, but if you want them to run a little more, you can station them behind the sideline.

To see more information about the DVD that this sample video came from, click here: All-Access Maryland Women’s Basketball Practice with Brenda Frese

Basketball Plays Hawks Double Rip

By Brian Williams on October 13, 2014

This man to man is from the FastModel Sports Basketball Plays and Drills Library The site has thousands of drills and plays that have been submitted by basketball coaches from around the world.

This play was contributed by Adam Spinella Assistant Men’s Basketball Coach at Division III Dickinson College in Carlisle, PA.

You can also find out more about their Play Diagramming software by clicking this link: FastDraw

The Double Rip action usually frees up the player you want to establish very deep position.

Run by Mike Budenholzer during his time as Hawks Head Coach.


basketball-plays-double-rip1


Horns formation start.

(1) passes to (4) on the elbow, curls over him and sets a screen for (3) to come get the ball from (4) in a handoff.


basketball-plays-double-rip2


Double Rip is set for (4) as (3) swings the ball to (5), who steps out.

(1) and (2) set the Double Rip.


basketball-plays-double-rip3


Screen-the-screener occurs as (3) sets a down screen for (2) to pop to the top of the key.

(1) clears to the corner.


Coaching Basketball Full Court Press

By Brian Williams on October 11, 2014

Some thoughts on pressing philosophy and a couple of drills to work on your presses.

These drills are from Trey Watts’ Meet the Press Playbook which is paired with the the Princeton Hybrid Offense Playbook this week’s eBook bundle.

You can find out more about the pair at this link: Princeton Hybrid Offense & Meet the Press Playbooks

If you have any questions about the Playbooks, please feel free to email me or call/text me at (317) 721-1527‬.

Keys to Pressing Success

Ball Pressure:

  • We must be able to exert pressure on the ball. It is vital that the man pressuring the ball be able to pressure without fouling. Fouling will negate all the work that the team is putting into our pressure defense.
  • We must not get beaten on straight line drives by ball handlers
  • We cannot let a ball handler look over our press and pick apart the gaps with passing. He must be forced to dribble.

Sprint Mentality

  • We must always have a sprint mentality. Regardless of what previously happened.
  • We must sprint to rotate.
  • We must sprint to recover.
  • We must sprint out of traps.

Rotation

  • We must rotate without hesitation. We can’t second guess whether we should go or where we should go.
  • Repetition has built confidence in our rotations.
  • Rotating out of traps is critical
  • Rotating on ball reversal is critical.

Backtips

  • We must become very good at backtipping dribblers.
  • If we get beat off the dribble our defenders must sprint and look for opportunities to backtip the ballhandler
  • It is very important that they sprint thru the backtip.
  • They chase the ball handler until he either passes or picks up the ball.

Anticipation

  • We our players to get good at anticipating what the offense will do.
  • Will they try to beat us off the bounce?
  • Where do they like to pass the ball?
  • We need to learn to read the passers eyes and anticipate where he is going with the ball.
  • Each is important that each player know what they are capable of doing on the court, coverage wise.

Backwash

  • We get a lot of steals in what we term “Backwash”
  • This is when the ball is headed up the sideline and our backside defenders are sprinting back down the middle of the floor.
  • Usually the offense is looking to make a cross court pass for a basket, we ANTICIPATE this pass and try to steal it in the BACKWASH.

Diagrams created with FastDraw

Help Side Wing Drill

basketball-drills-pressing1

This drill is designed to work on help side wing play. One of the most important team attributes of great pressing teams is PATIENCE. Traps and high tempo are not always in order.

The drill begins with the ball in 1st trap situation with X2 and X4.

The ball is then reversed to the middle of the floor and dribble hard at the weak side wing or held for a two count as some teams like to do against pressure.

In either case, the wing must exercise patience in order to allow teammates to recover to proper spots.

If the wing comes up too fast, the opponent will “dump” it right over the top ad create a numerical advantage BE PATIENT ON BALL REVERSAL

NOTE: X4 AND X3 MUST OPEN HIPS AND SHOULDERS TO DIRECTION THE BALL IS THROWN AND GET TO SPOTS SHOWN. WING SPRINTING OUT OF TRAP MUST

BE READY TO COVER DIAGONAL PASS. X1 MUST CROSS FLOOR QUICKLY TO BALL SIDE. X5 MUST MOVE TO WEAK SIDE NORMALLY.

*** AGAINST PATIENT, METHODICAL OPPONENTS WE ARE LOOKING FOR 2ND TRAP OPPORTUNITIES.

Pass Escapes

basketball-drills-press3

Here we want to work on how we react when someone makes a pass out of trap.

We will start with the players in a trap in the first trap area.

We start by the coach dictating where they will pass the ball for their escape.

We want to work on the reveral pass first.

Once the 1st pass is completed we play it out live, down and back.

Diagrams created with FastDraw


Pass Escapes II

basketball-drills-press4

Here we have the offense complete a pass up the sideline.

We consider this to be a vertical pass.

We will sprint from behind and trap.

X5 covers sideline.

X2 SPRINTS to cover backside.

X4 SPRINTS back.

Once the pass is completed it is live, down and back.

These drills are from Trey Watts’ Meet the Press Playbook which is paired with the the Princeton Hybrid Offense Playbook this week’s eBook bundle.

You can find out more about the pair at this link: Princeton Hybrid Offense & Meet the Press Playbooks

If you have any questions about the Playbooks, please feel free to email me or call/text me at 765-366-9673.

  • « Go to Previous Page
  • Page 1
  • Interim pages omitted …
  • Page 175
  • Page 176
  • Page 177
  • Page 178
  • Page 179
  • Interim pages omitted …
  • Page 288
  • Go to Next Page »

Primary Sidebar

  • Twitter
  • Facebook
  • Linkedin
coachestoolbox
personaldevelopmenttoolbox
basketballplayerstoolbox
basketballtrainer
athleticperformancetoolbox
coachingbasketball

© Copyright 2026 Coaching Toolbox

Privacy Policy