• Skip to primary navigation
  • Skip to main content
  • Skip to primary sidebar

  • Basketball Plays
    • Ball Screen Sets
    • Horns Sets
    • Man to Man Post Up
    • Man to Man Isolations
    • Backdoor Plays
    • Man to Man 3 Point Shot Plays
    • 2-3 Zone Attack
    • Baseline Inbound Plays
    • Sideline Inbound Plays
    • Combination Defense Attack
  • Drills
    • Defensive Drills
    • Offensive Drills
    • Competitive Drills
    • Passing Drills
    • Rebounding Drills
    • Shooting and Scoring Drills
    • Toughness Drills
    • Transition & Conversion Drills
    • One on One Drills
  • Blueprint
  • Practice
  • Mental Toughness
  • Skill Development
  • Offense
  • Defense
  • Store

Jim Boone Defensive Teachings

Jim Boone Defensive Teachings

By Brian Williams on March 9, 2017

These notes came from Bob Starkey’s (Longtime D1 Assistant Coach–currently at Texas A & M) Basketball Coaching Blog, hoopthoughts.blogspot.com.

Jim Boone of Delta State is one of the nation’s foremose teachers of the Pack Line Defense. Below is a list of key teaching points in Jim’s system. At the end of this story is the entire link the comes from his website: http://www.coachjimboone.com
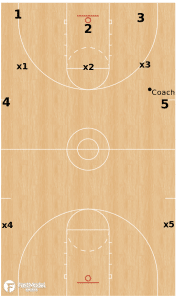
Conversion Defense
• There are two critical areas in regards to being an effective defensive team that you as the coach must be accountable. The first is conversion defense and the second is defending the low-post.

• In our Conversion Defense we are not assigned a specific player necessarily, but rather, we are defending positions on the floor in order to stop the ball and our opponents transition offense.

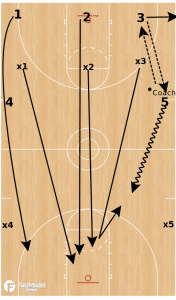
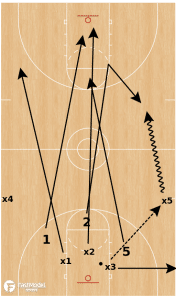
• Our conversion defense begins as the ball is being shot by our offense. We send two guards back on defense as the shot goes up – we feel that the benefit of having our guards back on defense to STOP the BALL, is of a far greater benefit than any advantage that may be derived by having one or both rebound the offensive glass.

We designate which guard is our “Lane Defender” and which guard is the “Ball Defender”. The lane defender sprints to paint, finds the ball and takes the lane-line on the side that the ball is being entered into play. He positions here in order to take away any cuts into the lane and will closeout to a “Gap Position” or to the ball, as soon as the lane is secured. The ball defender works to contain the ball-handler at half-court, and preferably get the ball out of the middle of the floor. Again, he must contain the ball first and foremost, and of course, his point of pick-up can change due to our opponent’s personnel.

• The remaining three players sprint back to paint as soon as our opponent gains possession of the ball. We teach their first three sprint steps to be with total disregard to vision; turn and sprint three steps, and then locate the ball as they continue to the lane. We will position toward the ball-side as deep as the ball. We cannot express enough the emphasis that we place upon our team of not giving-up transition baskets, NO LAY-UPS!

Pressure on the Ball
• We must place pressure upon the basketball, we cannot allow the ball handler to play comfortably, to easily look over the court. Offenses today will pick your defense apart if you allow them to do what they want to do with the ball. This is a great myth in the Pack Line Pressure Defense, that we do not pressure the ball – that we are all about containment. Yes, we must contain and our players must know their limitations, but we must pressure the ball.

It is much like the football quarterback; the passer that has all the time needed to drop back and throw the ball, any NFL quarterback will pick apart a defense that does not pressure – the same holds true with our game. With this being said, we cannot allow the ball to get into the PACK AREA. Our point of pick-up is at half court, in the play area it is determined by whom you are guarding – your game and his game.

As much as we want and demand pressure on the ball, we must also understand a very important axiom I our defensive game planning; “Sometimes to not guard, is to guard”. In other words, there are players that you are better served to not defend, and therefore, utilize this defender as a helper.
• We do not force the ball in a specific direction. We simply tell our players, “DO NOT GIVE-UP THE BASELINE”. We do not want them to feel that it is OK to force the ball to the middle, we just cannot get beat baseline. We will emphasize that our players must have their baseline foot positioned outside of the offensive player’s baseline foot.

• We will drill a lot of one-on-one in order for our players to learn their limitations, to understand how to keep the ball out of the PACK, and to learn how to force contested jump shots.

• We deny inside the arc and we will work on this more from a whole method standpoint more so than a 1on1 breakdown drill, but we absolutely do not want to allow the ball inside the PACK AREA (17 foot mark).

• Footwork is of paramount importance in our pressuring the ball, we want to Step (point our toe) in the direction that the ball is being dribbled, and Push with our opposite foot. We use the term, “Guarding a Yard” with our players, if we can execute two quick slides, we can arc and defend the ball. Use quick, short, steps without bringing our feet any closer than 12 inches, there is an imaginary ruler between our heels, no Heel Clicking.

• If we can force a Dribble-Used situation, we now leave the PACK area with all of our defenders, in an effort to all-out deny all four offensive players. This is a great opportunity for us to create a panicked, and hopefully a turnover situation for the offense. The player defending the ball must verbalize the dribble used situation by calling out “FIVE – FIVE – FIVE”.

Jumping to the Ball
• We do not jump to the ball per say, our first move is to jump back into the PACK AREA and then move toward the ball to preserve our Ball-You-Man relationship. Therefore, the nature of this position places our defender closer to the ball than the man who passed it.

• We assume a flat triangle position, slightly open and inside the PACK AREA when our man does not have the ball and is one pass away.

Closeouts
• Closing out to the ball is the key to our recovery mode, sprint the first two to three steps, with the last couple being short, choppy, steps. We must accomplish two objectives in our closeout; first we must closeout “Hard & Short” with our weight back prepared to absorb the dribble (we will not get blown away by the dribble), and secondly, we must have High Hands. We teach our players to keep their hands high, with elbows bent, for a 1001 count. We must create the illusion that there is no shot to be had. We cannot allow the offense to have rhythm jump shots.

Gap Defense
• All Non-Ball Defenders are located inside the Pack Line – This is the most critical part of our defense. We do not believe that our defenders can accomplish three things: they cannot Deny, Help, and Recover. Therefore, we have eliminated the denial, and we now focus entirely on the other two factors – Help and Recovery. Because our defenders in the Gap are already positioned in Help, they are now quicker in their recovery to the ball – there is no negative movement, away from their recovery.

• We are constantly “Re-positioning” in the Pack area:

1) Position Up the Line, but Off the Line – slightly closed to the Ball

2) Vision is of the utmost, we must see both Man and Ball

3) Do not Help to Take a Charge, but rather with our Near Arm and Leg, we do not want to become Blind to our Help, by losing sight of our man

4) Bluff help as much as possible, we cannot become sterile in our positioning.

5) We must be Active & Energized in our Gap – We are Zoning the Ball

Flash Post
• We are positioned in a flat triangle with our closest foot to the ball slightly forward, therefore we are in a denial position to begin and better equipped to take away the flash.

• VISION is key, WE MUST SEE BOTH MAN and BALL!

• Upon the offensive players flash cut, we intercept it with our forearm. We teach our defender to use his forearm, to bump or force the offense away from the lane without extending the forearm, which would be a foul, in order to deny.

It is a reality that our defender will momentarily lose sight of the ball, this occurs whenever we are defending a cutter, weather a screen is involved or not.

Defending the Low Post
• You must have a very clear and concise philosophy of defending the low post. How you defend this area dictates everything else you do defensively.

• There are only two areas to be defended; the low post and the perimeter. Everything that occurs in our Post Box (Approximately two steps off the lane and below the first hash mark on the lane) is considered the low post, everything else is the perimeter.

• We ¾ Deny on the High Side of the Post, we tell our players to “Smother” the Low Post. Activity is our biggest key, WE MUST BE ACTIVE!

• We can play ¾ high because we allow no baseline penetration. This also places us in a better position to take away the “High-Low” entry into the low post.

• We must know our slip-point in the low post; it can vary from player to player, depending upon size, length, and quickness. Anytime the ball is on the side and the offense tries to move us up the lane, upon approaching the mid-lane area we must slip behind to the baseline side to avoid being pinned high.

• Anytime a player steps away form the post, we then treat him as a perimeter player and deny inside the PACK AREA.

• There can never be a feed to the low post from the top, no exceptions!

• On a catch, we tell our post that this is our time, not the offensive player’s time, but our time. We must quickly slide behind the post on “air-time” – do not reach or gamble for a steal, but work to immediately position ourselves slightly to the baseline side with a half-step of cushion between our defender and the offensive player, maintaining a position between the post and the basket.

• From our position behind the low post, we will defend the ball in one of three ways:

1) Play the post one-on-one from behind – do not give up a scoring angle forcing the offensive player to score over our defender, not through our him. Our post defender must keep his hands at shoulder height with his fingers pointed upward. We teach our post to employ a one step cut-off in this area, using his chest to level off the dribble, take the hit and force the tough shot.

2) Choke the Post – our perimeter players located on the ball-side will open to the ball as it is passed and give help to the post defender. We can dive in and out to bother the post and choke the post only if he puts the ball on the floor, or we can full-out choke the post, immediately diving to the ball and digging it out, forcing him to throw the ball out to the perimeter. Obviously, if our perimeter defender is defending a dead three or a great scorer, we may determine not to choke with his defender, but only to bluff help.

3) RED THE POST – Double the post Big to Big. This is probably our most often utilized method of defending the post, and our most effective. It is a way in which we can force the ball back out of the scoring area, while creating turnovers.

You can download more of his defensive philosophy here: Jim Boone Pack Line Defense

3 on 3 Get Back Drill

By Brian Williams on March 7, 2017

This conversion defense drill was contributed by Coach Brett Campbell of St. Charles Boys Basketball to the FastModel Sports Basketball Plays and Drills Library.

You can also find out more about FastModel Play Diagramming software by clicking this link: FastDraw

These were Coach Campbell’s comments about the drill:

“This drill comes from Coach Jim Boone, the Head Coach at Delta State and is called the 3 on 3 Get Back Drill.

We have some teams in our conference that do a fantastic job of pushing the ball up the floor, even after made baskets.

This drill teaches our guys to do this- we call it “fast break makes”.

It also teaches the importance of transition defense and stopping the basketball.

We keep score and go live for a set amount of time with a consequence for the team that doesn’t win.”

1, 2 and 3 line up on the baseline with green shirts.

X1, X2, and X3 line up across the FT line with white shirts.

2 green lines up at each heat up line (4 and 5 in the diagram).

2 whites line up at the opposite heat up line (X4 and X5).

Coach starts with ball and passes to any player on the baseline.

Player who receives pass from Coach outlets the ball to 4 or 5 and then is out of the drill.

Defense sprints back to paint.

Stop the ball at the heat up line.

(Apply your own defensive conversion rules).

Then, play live half court 3 on 3.


When defense gets possession, they outlet the ball to strong side teammate at heat up line.

Offense must get back on defense.

Must touch the paint, then stop the ball.

(Again, apply your conversion defense rules).

If you don’t sprint back on conversion defense in practice, you don’t play in games.

2 Villanova Inbounds Plays

By Brian Williams on March 1, 2017

This post contains two inbounds plays from 2016 and 2018 Men’s National Champions Villanova and Coach Jay Wright.

The first play is a baseline inbounds play.

The second is for when you are inbounding the ball from the sideline.

Adjust these sets to fit your players and philosophy and/or take bits and pieces to combine with what you already run.

The plays are from The Best of Special Teams Playbook assembled by Chris Filios.

The playbook contains 210 basketball plays from 40 different NCAA teams.

It is paired with Faces in New Places 2017 as this week’s eBook special.

You can find out more about what is included in the bundle at this link:

Best of Special Teams Playbook and Faces in New Places 2017

You can also get any two of our eBooks for $25 at this link: 2 eBooks for $25

If you have any questions, feel free to call/text me at 317-721-1527‬ or email me at [email protected]

Diagrams created with FastDraw

Villanova Curl Pin BLOB

3 cuts off a back screen from 1.


4 and 5 set a double staggered screen for 1.


If 1 is not open, he stops and screens with 5 for 4.

You can adjust to have 1 or 4 dive after they screen


Villanova Line SLOB

5 cuts to the ball side block.

2 loops between 4 and 1 to the opposite block.


4 turns and screens for 1.

1 cuts to the ball and receives the inbounds pass from 3.


3 cuts inbounds as soon as the pass is made.

4 receives a rescreen ball screen from 4.

2 spaces to the corner.

Another way to run this would be for 3 to cut in and get a hand back from 5 and then come off of 4s on ball screen.


The plays are from The Best of Special Teams Playbook assembled by Chris Filios.

The playbook contains 210 basketball plays from 40 different NCAA teams.

It is paired with Faces in New Places 2017 as this week’s eBook special.

You can find out more about what is included in the bundle at this link:

Best of Special Teams Playbook and Faces in New Places 2017

You can also get any two of our eBooks for $25 at this link: 2 eBooks for $25

If you have any questions, feel free to call/text me at 317-721-1527‬ or email me at [email protected]

100 Point Shooting Game

By Brian Williams on February 28, 2017

This video is one of the great resources available from basketballhq. They have several more videos as well as basketball coaching resource articles.

Matthew Graves is the Former Head Men’s Coach at South Alabama. He was an Assistant to Brad Stevens and a player at Butler prior to taking the job at South Alabama. He is currently serving as an assistant at Xavier.

You can tweak the drill to make it fit what you want. For example, you might rather have the 1 point shots be free throws or floaters rather than layups.

The total possible points is actually 120 and not 160.

You can decide whether or not you want to include the one and one as a bonus.

I like the idea of including free throws with pressure anytime I can.

Another thought is to have the player shoot a finishing move, a floater, or give them some type of resistance. I believe the one point shot in the drill should be a little more meaningful and game-like. You want to put in something that will facilitate improvement.

Please make sure your sound is on to see the video.

Click the play arrow to see the drill.

The drill is a You Tube video, so you will need to be able to access YouTube to see the drill.

100 Point Shooting Game

Don Meyer Basketball Coaching Notes

By Brian Williams on February 27, 2017

Coaching notes from Don Meyer:

How to Evaluate a Game: Tools that we use to determine how well or poorly our team actually played. Many times the scoreboard is a poor judge of your team’s performance.

1. Turnover Margin: Looks to see if your team has “sureness” with the ball on offense and whether your team can create turnovers on defense. As the coach, you might have a goal of having a +5 margin, for instance, or you might set a mandatory goal of, for example, always having less than 10 turnovers and having a goal of forcing at least 15 turnovers.

2. Rebound Margin: Using a rebounding margin is a good barometer of how well you competed on the glass, and is probably better than measuring your rebounding effort with absolute numbers. For example, having a goal of out-rebounding your opponent by +10 is probably more realistic than saying that your goal is to get 50 total rebounds every game. Each game will have a varying number of rebounding opportunities due to the pace of the game, referees, etc.

3. Field Goal Attempts: If everything is equal, the team that gets the most and the best shots will win. Newell’s Rule = “Get better shots than your opponent and get more of those better shots.”

4. Field Goal %: Two rules that your program could live by are; your best shooter should have the most shots (shooting isn’t equal opportunity) and your worst shooter should have your best FG% (only takes lay-ups, wide open shots).

NSU Shot Grading System:

4 = Wide open lay-up
3 = Wide open shot by good shooter
2 = Contested shot by good shooter
1 = Terrible shot
0 = Turnover

5. Free Throw Attempts: The golden rule is to make more free throws than your opponent attempts.

6. Free Throw %: It’s one thing to get to the free throw line; it’s another thing to make your free throws. Great teams make their free throws.

7. No opponents player scores more than 15 points: We like to use 15 points as a barometer to see if any one player really hurt our team. Most teams may have one or two stellar scorers that require special attention on defense and if our team can’t slow those players down, it will be a long night. Holding great scorers under 15 points is a great measure of how well your team is playing team defense, because it’s very difficult, if not impossible, to stop a great scorer with one defender; help-side, rotations, and an overall effort by all five players on the floor is required.

8. 3-Point Game: Refers to both on offense and on defense. On offense, it’s simple enough – your team must make open 3’s. The players that are great 3-point shooters need to be the ones taking those shots. On defense, we always stress the concepts of “No 3’s to a 3” and the concept of a “Dead 3” ? A player that has at least 50% of his / her attempts from the three-point line. A Dead 3 gets no standing looks; he / she must dribble to a shot. Thus, how well did your team defend the 3-pointer? Also, how well did your team get your 3-point shooters open?

9.Floor Game: The floor game encompasses a wide range of possibilities, including getting loose balls, taking charges, saving the ball from a turnover (saver-savee idea), etc. Your team could have a goal of taking a minimum of 2 charges, or getting 90% of all loose balls, etc.

10. Assist Game: The assist game can mean many things. As a coach, you can look at your team’s assist: turnover ratio, possibly with a goal of 2 assists to 1 turnover (2:1). In addition, you can look at the assist to made basket %. Another, less subjective way of tracking assists would be to track how many “screen assists” your team has in a game; the number of times that a team member’s screen (possibly a back or flare screen) led to a wide open shot or lay-up.

4 Types of Players:

1. Unconscious & Incompetent: These types of players “don’t know that they don’t know.” They aren’t even aware that they don’t have a feel for the game. These players aren’t going to contribute on a winning team.

2. Conscious & Incompetent: These players now realize that “they know they don’t have it.” These players still don’t have a feel for the game and are lacking in the skill department but they realize where their weaknesses are and can now begin to improve ? Awareness is the beginning of correction.

3. Conscious & Competent: At this level of development, the player is able to perform various skills (competent), but he / she must think about everything that he is doing before performing the skill; i.e. catch the ball, go into triple threat, direct drive, etc. ? You know, but you don’t flow. Very robotic.

4.Unconscious & Competent: The most difficult level to reach, this player can perform the skills without having to think about them. For this type of player, the game naturally “flows.”

“The Anal Coach”

The final topic that we shall discuss is the idea of the anal coach. There is always a discussion as to how much control the head coach should exert over his players. Should he (or she) dominate the players, attempting to control every aspect of their games, not to mention their lives? Or, should the coach be a “player’s coach” and cater more to the needs of the player? While there is no clear-cut answer, and while it can be argued that both ways work in certain situations, we would like to talk about the concept of the anal coach and what that coach will do to a team.

We argue that the anal coach will always have good teams, but never great teams because that coach can’t let the player’s play. An anal coach will make bad teams better because of the control, discipline and organization implemented into the program, but at the same time, an anal coach will also make good teams worse, because he will confine the players to a certain degree; he won’t be able to let them make plays because he has to control everything on the floor.

Key quotes:
•A weaker coach has to exert more control
• A stronger coach does not have to exert much force
• The strong can be kind, the weak must be cruel – Sun Tzu.

Man to Man Dribble Weave Actions

By Brian Williams on February 26, 2017

These plays are quick hits to run against a man to man defense..

It is from an old Xavier Men’s Basketball Newsletter.

If you are interested in subscribing to their newsletter, you can do so at this link: Xavier Newsletter

You might not be able to run the entire play, but possibly a few of the cuts, screens, and principles can be applied to what you already run.

There are links to other plays from Xavier newsletters at the bottom of this post

Diagrams created with FastDraw


Weave Ball Screen #2

1 Dribble Flips w/ 3.

3 Reverses to 2.

4 Cuts Filters to Opposite Wing.


2 DHO’s w/ 4.

3 Replaces Himself.

4 Reverses to 3.


5 Sets Backscreen for 4.

5 Sets Ballscreen for 3.

5 Rolls to Basket.

1 Replaces 3.


Weave Pop

1 Dribble Flips w/ 2.

2 Dribble Flips w/ 3.


5 Cuts to Elbow.

3 Passes to 5.

4 Sets Backs screen for 2, then pops to the arc.

5 Skips to 4.


  • « Go to Previous Page
  • Page 1
  • Interim pages omitted …
  • Page 98
  • Page 99
  • Page 100
  • Page 101
  • Page 102
  • Interim pages omitted …
  • Page 288
  • Go to Next Page »

Primary Sidebar

  • Twitter
  • Facebook
  • Linkedin
coachestoolbox
personaldevelopmenttoolbox
basketballplayerstoolbox
basketballtrainer
athleticperformancetoolbox
coachingbasketball

© Copyright 2026 Coaching Toolbox

Privacy Policy